How to Follow a Sourdough Starter Feeding Schedule in 2024
A proper sourdough starter feeding schedule is key to baking great sourdough bread. Your living culture needs regular attention to give you the best results. Both new and seasoned bakers must know the right feeding methods because a healthy starter shapes your bread’s flavor, texture, and rise.
The magic happens when you feed wild yeast and lactic acid bacteria with flour and water regularly. This piece shows you everything – from picking the right container to getting your feeding ratios perfect. You’ll discover how to adapt your feeding schedule to match how often you bake. The guide also teaches you to keep fermentation active and spot the signs of a thriving starter. When problems pop up, you’ll know exactly what to do.
Choosing the Right Container and Tools
The right container and tools play a significant role in keeping a healthy sourdough starter. Your feeding schedule will work better with proper equipment that promotes optimal fermentation and simplifies maintenance.
Selecting a jar or container
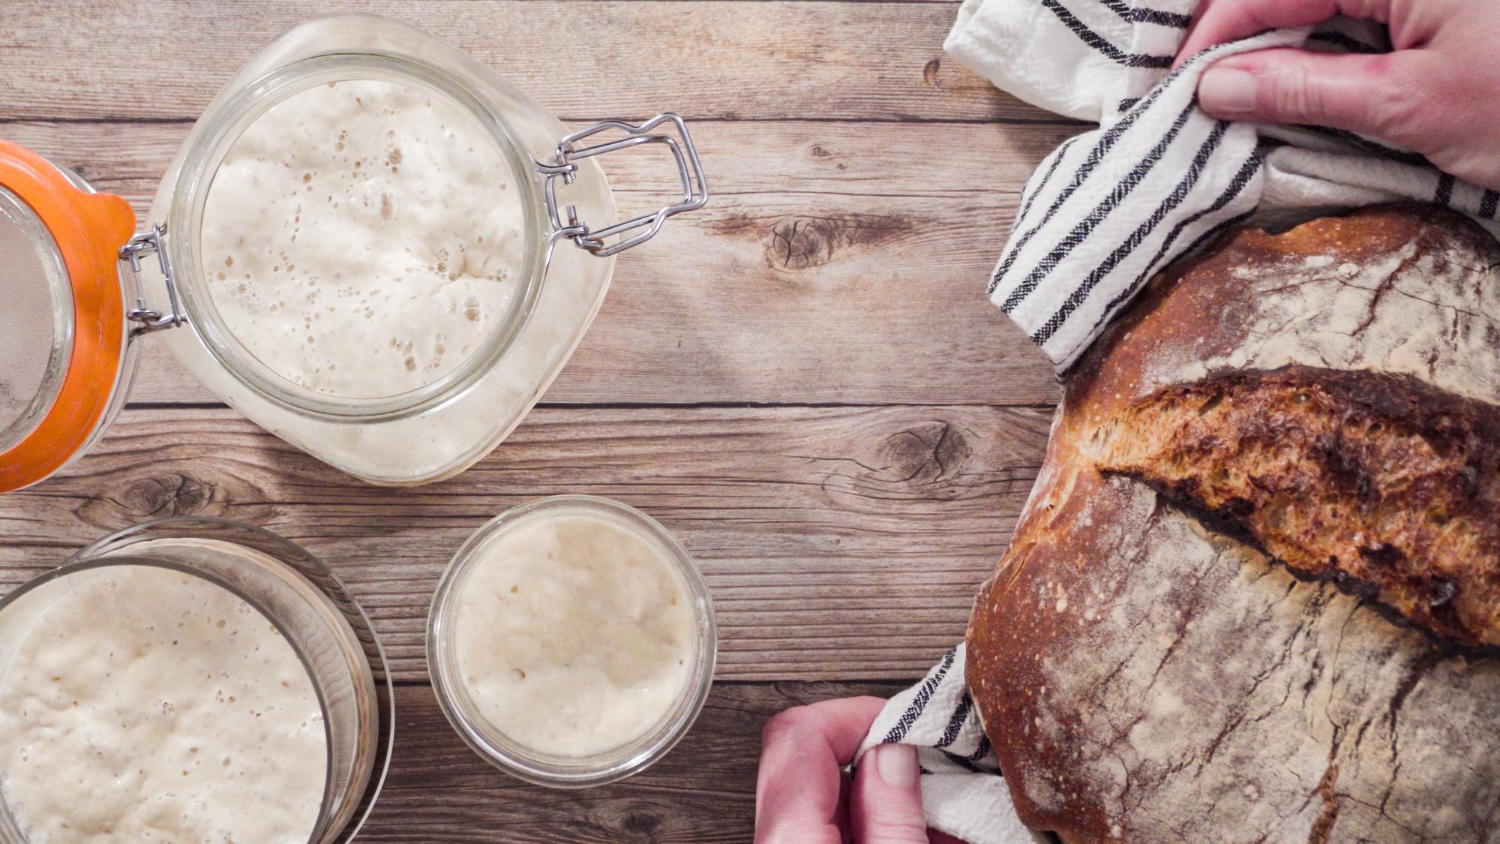
A glass container stands out as the best choice to store a sourdough starter. Glass won’t react with the acidic fermentation environment and lets bakers see their starter’s activity clearly. Many experienced bakers prefer the 3/4 liter Weck jar because its straight sides and wide mouth make feeding and cleaning easier.
The container’s size matters substantially – your jar should hold at least twice the starter’s volume to allow fermentation growth. Straight sides prevent starter from building up in curves or shoulders. A wide-mouth design gives you easy access when feeding and cleaning. Mason jars work too, but their rounded shoulders can make maintenance harder.
Tools you need for feeding
A baker’s success depends on having the right tools that work for starter maintenance:
- Silicone spatula or Danish dough whisk to mix ingredients
- Bench scraper to clean and handle dough
- Bowl scraper to remove starter from jars
- Measuring tools to track feeding ratios
- Clean cloth or paper towels to wipe jar rims
Creating a clean environment
Your starter’s health depends on a sanitary environment. The container needs regular cleaning, though complete sterilization isn’t necessary. Warm water and mild soap work best for cleaning, and you should rinse thoroughly to remove soap residue. The container must air dry completely before the starter goes back in.
Your jar’s covering plays a crucial role – it must let gasses escape while keeping contaminants out. Weck jars work great with the glass lid placed loosely on top without rubber gaskets and clips. Other containers do well with a loose-fitting lid or cloth cover. Tight seals pose a risk as they trap fermentation gasses that build pressure.
The jar stays cleaner if you wipe its rim and sides after each feeding. This prevents dried starter buildup and reduces contamination risks. Some bakers move their starter to a fresh jar at feeding time. A well-maintained single container works just as well and helps the starter remain stable.
Keep your tools clean and dry between uses. A dedicated space away from sunlight and temperature changes will give your starter consistent results. This all-encompassing approach makes your feeding schedule easier to follow.
Mastering the Feeding Process
A sourdough starter thrives when bakers understand the delicate balance between feeding and fermentation. Regular feeding will give a healthy starter that stays active and develops rich flavors through bacterial and yeast cultivation.
Discarding and feeding ratios
You need to start by discarding half of your existing starter. This may look like you’re wasting it, but this step helps maintain proper acidity levels and prevents your starter from growing too large. Most bakers use a 1:1:1 (starter:water:flour) ratio. Some prefer 1:2:2 or maybe even 1:5:5 based on their schedule and environment.
- Remove half the existing starter
- Add equal parts flour and water by weight
- Mix really well until smooth
- Cover loosely and let ferment
- Repeat process at next feeding
Mixing techniques
Good mixing will give you an even mix of fresh flour and water in your starter. A stiff silicone spatula or Danish dough whisk works best to mix the ingredients into something like thick pancake batter. Your mixture should not have any lumps, and all flour needs to be fully hydrated. The container’s sides need regular scraping to avoid dried starter buildup and keep things clean.
Observing fermentation activity
A healthy starter shows clear signs of fermentation activity that bakers need to watch regularly. These signs will help you know if your starter is ready to use:
- Consistent bubble formation throughout the mixture
- Doubling in volume within 4-8 hours of feeding
- Pleasant, slightly sour aroma
- Spongy or fluffy texture when peaked
- Passes the float test (a spoonful floats in water)
Temperature plays a significant role in fermentation activity. Your starter will thrive between 70-75°F (21-24°C), though it can adapt to different conditions. Higher temperatures speed up fermentation, while cooler environments slow it down. You can boost activity in cooler conditions by using lukewarm water (up to 85°F/29°C) during feeding.
A dark liquid layer (hooch) on top of your starter means it needs feeding. You can stir this liquid back in or pour it off before feeding. Hooch isn’t harmful, but it suggests your starter needs more frequent feeding or a different feeding ratio.
Watching your starter daily helps you understand its behavior and adjust the feeding schedule. A mature starter displays the same fermentation signs each day that shows a stable mix of lactic acid bacteria and wild yeasts working together.
Adjusting Your Schedule for Different Needs
A sourdough starter needs flexible maintenance that lets bakers adapt their feeding schedule based on their lifestyle and requirements. Bakers can achieve consistent results by adjusting their maintenance routines. This approach will give a perfect balance between regular baking needs and efficiency, regardless of daily or occasional baking preferences.
Daily feeding for frequent bakers
Regular feedings at room temperature work best when you bake sourdough products three to four times weekly. A twice-daily feeding schedule works best, with feeds happening every 12 hours. This schedule ensures your starter stays active and ready whenever you need it.
Active bakers should follow these guidelines to succeed:
- Keep temperature between 70-75°F (21-24°C)
- Feed at consistent intervals (morning and evening)
- Look for peak activity 2-4 hours after feeding
- Change ratios based on your environment
Weekly feeding for occasional use
Bakers who make bread once or twice per week will find refrigeration a practical solution. Cold temperatures slow down fermentation. This means you can feed your starter less often and it stays viable. Your weekly schedule should look like this:
- Feed the starter with a 1:2:2 ratio before it goes in the fridge
- Keep it in an airtight container at 38°F (3°C)
- Take it out of the fridge 24 hours before you need it
- Give it 2-3 feedings at room temperature before you bake
- Feed it one last time after baking and put it back in the fridge
Preparing for extended breaks
Bakers need to take special care of their starters during long breaks. Several storage options work well for breaks that last weeks or months. The dried starter method is exceptionally effective and keeps your starter alive for eight months or more.
Here’s how to get your starter ready for long-term storage:
- Make it stiff by reducing hydration
- Spread a thin layer on parchment paper or silicone mat
- Let it dry completely in a warm, dry spot
- Put dried pieces in an airtight container
- Store it away from sunlight and moisture
Your stored starter needs time to come back to life. It usually takes 3-4 days of regular feeding before it bounces back to full strength. The right temperature substantially affects how well it revives, and you’ll get the best results at 78-82°F (25-26°C).
Refrigeration works fine for shorter breaks of 2-3 weeks. Keeping it in the fridge longer than three weeks means it will take more time to revive and might not ferment as well. The dried storage method is more reliable in these cases.
Smart bakers keep backup portions of dried starter. This helps them preserve their specific strain if something goes wrong with their main culture. It’s also a great way to share starter with other bakers or save heritage cultures.
The revival process works best when you know what healthy fermentation looks like. A healthy revived starter shows steady bubble formation and doubles in size as expected. It should also have that pleasant, slightly sour smell that tells you the fermentation is active.
Troubleshooting and Optimizing Your Starter
Bakers need to understand common problems and optimize their culture to maintain a sourdough starter successfully. A methodical troubleshooting approach helps achieve the desired fermentation results and keeps starters healthy consistently.
Addressing common problems
Every baker faces starter problems eventually. You can solve these challenges quickly if you spot them early:
- Hooch Formation: A dark liquid appears on top when your starter is hungry – feed it more often or adjust your ratios
- Slow Rise: Your starter’s temperature is a vital factor – keep it at 74-76°F (23-24°C) for best results
- Acetone Smell: Your starter has overfermented – refresh it with more frequent feedings
- Mold Growth: You need to start fresh if you see pink or orange colors
- Inconsistent Activity: Your feeding schedule might be irregular
Temperature plays a significant role if your starter becomes sluggish. Your fermentation patterns become more predictable with consistent warmth. Watch your starter’s peak activity time carefully. This usually happens 4-6 hours after feeding under the right conditions.
Experimenting with different flours
Your choice of flour affects starter behavior and performance by a lot. Whole grain rye flour works great because it contains more enzymes and nutrients. Experienced bakers add some rye flour to make their starters more active.
Different flour combinations give you unique benefits:
- 50% rye + 50% bread flour: Balanced activity and stability
- 90% white flour + 10% rye: Better activity without too much sourness
- 100% whole wheat: Faster fermentation but needs closer monitoring
- All-purpose flour: Mild flavor profile that performs consistently
The amylase enzymes in whole grain flours break down complex sugars faster. This makes food more accessible to beneficial bacteria. That’s why whole wheat and rye starters show more activity than those fed with refined flours.
Fine-tuning your process
Your starter needs careful attention to several key factors. Temperature, feeding ratios, and timing blend together to create perfect fermentation conditions. A 1:5:5 ratio (starter:water:flour) fed twice daily at 12-hour intervals gives great results.
Successful bakers watch their starter’s behavior closely. They look for fermentation signs through bubbles and smells. The feeding ratios change based on room conditions. They keep feeding temperatures steady and track how changes affect their starter. Spring or filtered water works best since chlorine can hurt fermentation.
Bakers who understand how protease enzymes affect gluten structure can spot the best feeding times. Your starter peaks too fast? A bigger feeding ratio (1:10:10) slows fermentation and makes results more reliable.
Your flour choice affects peak timing. Whole wheat starters peak faster than bread flour ones because they have more nutrients. But they don’t stay at peak long, so you need precise timing to bake.
Smart bakers keep backup starter portions dry to preserve their unique strain. This backup comes in handy to share with other bakers or save heritage cultures, especially when you have to ship them.
Big air bubbles and fruit-like smells show good fermentation and right feeding times. A starter that’s managed well follows patterns you can count on, which helps plan feeds and baking times.
Want to boost your starter’s strength? Mix in some fresh-milled flour – just a small amount works. This gives extra nutrients and enzymes that create stronger fermentation while your bacterial balance stays stable.
Conclusion
Sourdough starter maintenance needs attention to key factors that work together naturally. Clean containers, precise feeding ratios and consistent schedules are the foundations of reliable fermentation. Bakers can adapt their maintenance routines while keeping their starter healthy through temperature control, proper tools and regular monitoring. These basic practices lead to predictable, successful results for baking schedules and storage needs of all types.
Proper feeding techniques turn ordinary flour and water into a thriving culture that creates exceptional bread. Each feeding builds on previous success and develops complex flavors through careful cultivation of beneficial microorganisms. The starter gains reliable rising power with each feed. Bakers who want to experience authentic sourdough can lift their bread and pizza game with an artisanal sourdough starter from The Yeast We Can Do – email john@theyeastwecando.com to get our premium sourdough starter. Your attention to starter health and proper maintenance techniques will reward you with consistent, professional-quality results that show the true art of sourdough baking.
FAQs
What is the optimal feeding schedule for a sourdough starter?
To maintain a healthy and active sourdough starter, it is advisable to discard a portion and replenish it with fresh flour and water every 24 hours. In warmer conditions or for quicker fermentation, consider feeding your starter twice daily, approximately every 12 hours, to ensure it remains vigorous.
How should I continue feeding my sourdough starter?
For a starter kept at around 76°F (24°C), it typically ripens every 12 hours. When feeding, reduce the starter in the jar to 20g, then add 70g of fresh all-purpose flour, 30g of whole rye flour, and 100g of water. Mix thoroughly until the mixture is homogeneous.
Is it necessary to discard some sourdough starter at each feeding?
Yes, it is recommended to feed the starter twice daily, retaining only 1/2 cup of the original starter each time. The rest should be discarded, and then replaced with an equal weight of water and flour. This routine results in discarding nearly a cup of sourdough starter daily.
Must sourdough starter be fed precisely every 24 hours?
Initially, feed your sourdough starter every 12 hours until it becomes well-established and shows signs of activity, such as bubbling. After 3-5 days, you can reduce the feeding frequency to once daily.
Can I adjust my sourdough starter feeding times to suit my schedule?
Yes, you can adjust feeding times to fit your schedule. If you typically feed your starter at night but want to use it at its peak activity, consider feeding it again 12 hours later in the morning. Alternatively, you could adjust your feeding schedule to the morning to catch the peak activity when you are most likely to use it.
How often should I feed my sourdough starter if I only bake on weekends?
For those who bake primarily on weekends and prefer not to feed their starter multiple times daily, storing the starter in the refrigerator and feeding it once a week is a viable option. This method slows down the activity but keeps the starter alive. Adjust feeding times based on your starter’s performance and your baking schedule.