How to Make Sourdough Focaccia: A Beginner’s Guide
Sourdough focaccia delivers a perfect blend of tangy wild yeast fermentation and the unmistakable texture of traditional Italian flatbread. Home bakers can become skilled at making this versatile bread that works beautifully with any topping. From classic rosemary and tomatoes to modern flavor combinations, this rustic bread transforms simple ingredients into excellent results.
Making sourdough focaccia is an experience that starts with a healthy starter and leads to mastering the stretch and fold technique. This piece walks you through each stage of bread-making – from picking the right tools to measuring ingredients. You’ll discover proper fermentation methods, learn to handle the dough and find the best ways to add your favorite toppings that enhance flavor and texture.
What You’ll Need
Bakers need specific ingredients and equipment to create perfect sourdough focaccia. Proper tools and quality ingredients are significant elements that make this Italian flatbread’s ideal texture and flavor.
Ingredients
Everything in a perfect sourdough focaccia comes down to these simple components:
| Ingredient | Quantity | Notes |
|---|---|---|
| Active sourdough starter | 50-100g | Must be bubbly and active |
00 Flour
| 512g | 12.7% protein content recommended |
| Water | 430-440g | Room temperature |
| Fine sea salt | 10g | Kosher or sea salt is preferred |
| Extra-virgin olive oil | 3 tablespoons | Plus, extra for drizzling |
| Optional toppings | As needed | Rosemary, garlic, tomatoes, olives |
Remember that you might need to reduce water content to 375g if you live in a humid climate. King Arthur bread flour works best because of its consistent protein content.
Equipment
You’ll need several essential tools to make great sourdough focaccia.
Must-Have Equipment:
- Digital kitchen scale (significant for exact measurements)
- Large mixing bowl
- Dough scraper (plastic or metal)
- Straight-sided vessel for fermentation
- Half sheet pan or similar baking pan
- Flour sack towels or cotton cloths
- Parchment paper
Additional Helpful Tools:
- Spatula for mixing
- Bowl covers for proofing
- Sharp knife for scoring
- Reliable oven thermometer
The digital scale needs special attention because it will give a perfect measurement every time. This becomes especially important when you have sourdough in your hands. While you can substitute some tools with items from your kitchen, exact measurements are non-negotiable if you want consistent results.
New bakers should start with a purchased starter instead of making one from scratch. This lets you focus on becoming skilled at handling dough and understanding fermentation while using a proven culture.
Your dough’s fermentation depends heavily on temperature. A steady environment of 68-70°F (20-21°C) helps achieve the best results. Your kitchen should maintain these conditions throughout the proofing process.
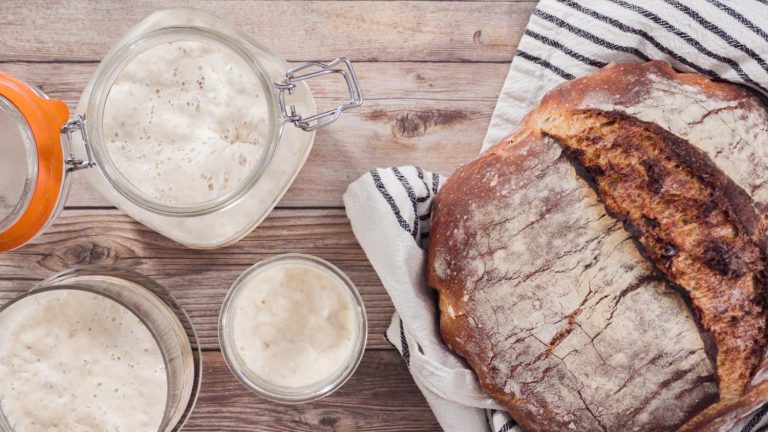
Creating and Feeding Your Sourdough Starter
A healthy sourdough starter is the foundation of exceptional sourdough focaccia. The living culture contains wild yeast and beneficial bacteria that need proper care and maintenance. These elements create the tangy flavor and provide the leavening power needed for perfect bread.
How to Make a Starter from Scratch
Creating a sourdough starter takes about seven days of steady attention. To kickstart fermentation, start with whole wheat flour. Later, switch to all-purpose or bread flour for regular feeds. The process needs a clean glass jar, filtered water, and close attention to temperature.
The simple schedule works like this:
| Day | Action | Ingredients |
|---|---|---|
| 1 | Original mix | 60g whole wheat flour + 60g water |
| 2 | First feed | Discard half, add 60g flour + 60g water |
| 3-7 | Regular feeds | Discard half, add 60g flour + 60g water daily |
Temperature is a vital part of starter development. Your starter needs an environment between 70-75°F (21-24°C) to ferment properly. The starter becomes ready to bake when it shows these healthy signs:
- Doubles in size within 4-6 hours after feeding
- Shows abundant bubbles throughout
- Maintains a pleasant, slightly sour aroma
- Passes the float test in room-temperature water
Maintaining Your Starter
After a few months, a starter needs regular feeding to stay strong. If you bake sourdough focaccia often, keep your starter at room temperature and feed it daily. The standard feeding ratio is 1:1:1 (starter:flour: water) by weight. Some bakers use a 1:2:2 ratio to get more mature fermentation.
If you bake less often, your starter only needs weekly feeding in the refrigerator. This works better for home bakers. Take your starter out of the fridge and feed it 2-3 times at room temperature before making sourdough focaccia. This helps restore its full strength.
Important Note: Metal utensils can harm your starter’s culture. Stick to the glass or plastic tools listed in the equipment section.
Your starter’s strength plays a key role in the quality of your sourdough focaccia. Weak or underfed starters lead to dense bread that won’t rise well. Regular feeding schedules and watching fermentation activity will help you bake great sourdough consistently. A well-cared-for starter can last forever and become a valuable part of your kitchen.
Preparing the Focaccia Dough
Making perfect sourdough focaccia demands precise techniques. You need to master the basics to create its signature chewy texture. The right approach helps develop that distinctive open crumb structure that makes this Italian bread unique.
Mixing the Ingredients
A proper mixing stage forms the foundations of successful fermentation. Start by combining the active sourdough starter with room-temperature water in a large mixing bowl and stirring until the starter dissolves completely. Next, add the flour and salt to create a sticky, high-hydration dough.
Hand mixing works better than machine mixing for this bread style because bakers can control gluten development better. Bakers should follow these steps:
- Start with wet hands to prevent sticking
- Mix until no dry flour remains visible
- Let the dough rest for 30-60 minutes (autolyze)
- Mix gently at first to avoid tearing
Bulk Fermentation
Bulk fermentation changes the original sticky mass into a strong, elastic dough through carefully timed folds. The process takes 8-12 hours based on room temperature:
| Temperature | Fermentation Time |
|---|---|
| 68°F (20°C) | 12+ hours |
| 75°F (24°C) | 8-10 hours |
| 80°F (27°C) | 3-4 hours |
Bakers perform stretch and fold sequences every 30-45 minutes during the first 2-3 hours of bulk fermentation. Each fold builds the dough’s structure and traps air, which are the foundations of focaccia’s signature texture.
Your dough is ready for the next stage when it shows these signs:
- Doubles in volume
- Develops a smooth, elastic texture
- Shows visible air bubbles throughout
- Feels light and puffy to touch
Room temperature should stay between 68-70°F (20-21°C) to get the best results during bulk fermentation. Higher temperatures speed up fermentation but reduce flavor complexity. This process needs patience because proper fermentation builds both structure and flavor.
Focaccia dough’s high hydration level (80%) creates a wet, sticky consistency that challenges new bakers. Wet hands and gentle handling prevent dough tears and protect its delicate gluten structure. The dough needs careful lifting and stretching without breaks to develop strength and keep the gasses that create the desired open crumb.
The dough changes from a shaggy mass to a smooth, cohesive structure as fermentation continues. This development shows strong gluten bonds and proper fermentation activity, revolutionizing the classic focaccia texture.
Shaping and Proofing
Shaping and proofing skills turn a well-fermented dough into authentic sourdough focaccia’s distinctive flatbread. This significant step shapes the bread’s final texture and look.
Stretching and Folding
After bulk fermentation, bakers develop the dough’s structure through precise movements. They coat their hands with olive oil to prevent sticking. To build optimal strength, the dough needs four stretches and folds at 30-minute intervals.
For each set of folds:
- Gently lift one side of the dough
- Stretch upward without tearing
- Fold over to the opposite side
- Rotate the container 90 degrees
- Repeat three more times to complete the set
Each folding sequence helps the dough change from a loose mass into a smooth, cohesive structure. Temperature control is significant, and bakers achieve the best results at 76-78°F (24-25°C).
Final Rise
The dough completes its final proofing phase in a smooth rectangular pan. This stage takes 4-6 hours, though ambient temperature affects the timing:
| Temperature | Proofing Duration |
|---|---|
| 68°F (20°C) | 6-8 hours |
| 75°F (24°C) | 4-6 hours |
| 80°F (27°C) | 3-4 hours |
Bakers should perform gentle stretches at 30-minute intervals during the first hour to help the dough reach the pan’s corners. The dough expands naturally through the proofing process and needs minimal handling. Aggressive stretching can damage the delicate gluten structure, which makes patience crucial.
Several indicators signal proper proofing:
- Dough fills the pan completely
- Surface appears puffy and pillowy
- Visible bubbles form throughout
- Dimples remain when pressed gently
- Dough feels light and airy to touch
The proofing pan needs a warm spot, like the top of a preheating oven. These conditions create the perfect environment that supports bubble formation and the final rise. The dough naturally spreads to roughly 14 x 9 inches (36 x 23 cm), though pan size might alter these dimensions.
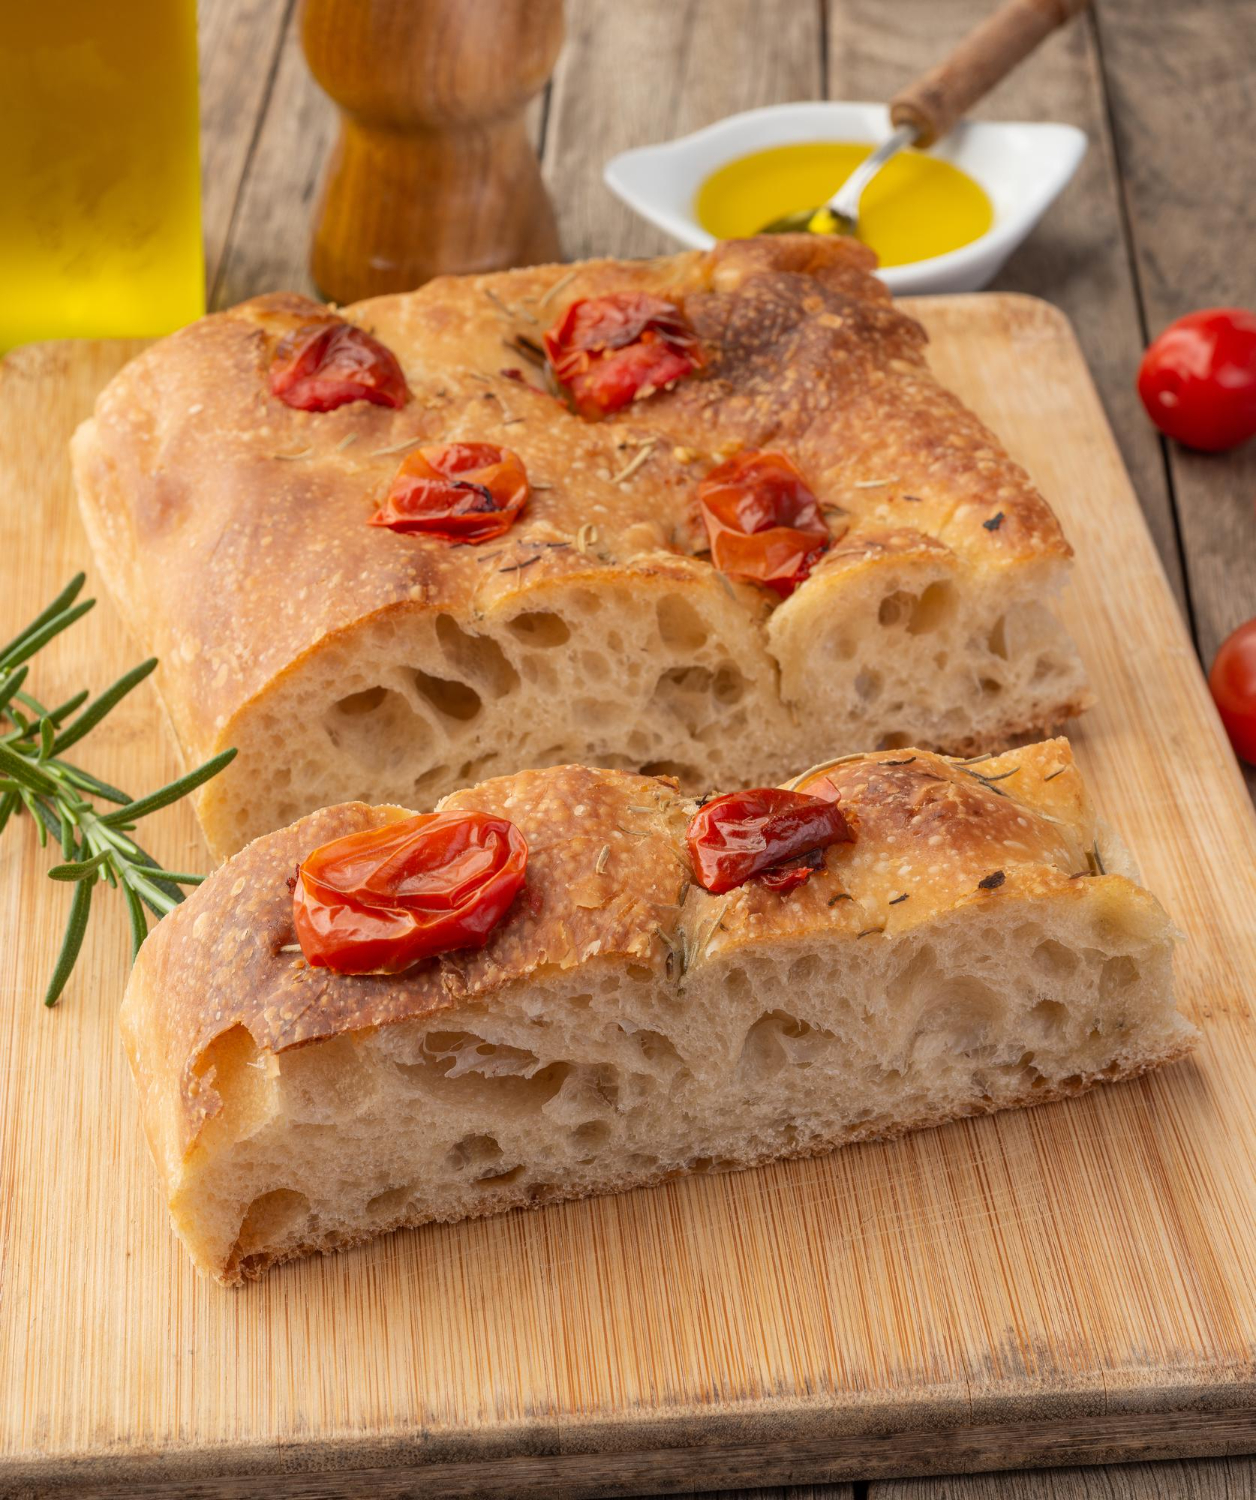
Bakers use oiled fingertips to create the signature dimpling pattern before baking begins. This final step shapes the characteristic focaccia texture and creates perfect pockets where olive oil and toppings settle. The dimpling process should be gentle but firm to maintain the developed gas structure while achieving the traditional focaccia appearance.
If the dough resists stretching or dimpling, it might need extra proofing time. Properly proofed dough responds efficiently to gentle manipulation, unlike under-proofed dough, which quickly springs back when touched.
Baking Your Sourdough Focaccia
A perfect sourdough focaccia comes to life in its final stage. Previous preparation steps blend together beautifully. The result is a masterpiece with a crispy crust that gives way to a tender interior, while its golden-brown surface releases an inviting aroma.
Dimpling and Topping
A well-proofed dough becomes the signature focaccia texture through its characteristic dimpling technique. The process starts with 2-3 tablespoons of high-quality olive oil drizzled over the dough’s surface. Coated in oil and held like claws, your fingertips must press deep into the dough to create indentations across the surface. These dimples work in multiple ways:
- Prevent excessive rising during baking
- Create pockets for olive oil and toppings
- Develop the classic focaccia appearance
- Allow for even heat distribution
The perfect topping application needs these basic rules:
- Mix all toppings with olive oil before applying
- Press toppings firmly into the dimples
- Use woody herbs like rosemary and thyme to get the best results
- Avoid wet ingredients that might create soggy spots
Oven Temperature and Timing
The right temperature control and timing are vital in creating the perfect balance between a crispy exterior and a tender crumb. Your bread will go through these specific baking phases:
| Baking Phase | Temperature | Duration | Notes |
|---|---|---|---|
| Original Bake | 450°F (230°C) | 15 minutes | Covered with foil |
| Final Bake | 450°F (230°C) | 10-15 minutes | Uncovered until golden |
| Alternative Method | 425°F (218°C) | 25-30 minutes | Single phase uncovered |
Place the rack in the center of your oven and let it preheat completely before baking. After baking, move the focaccia to a cooling rack so the bottom stays crispy.
Par-Baking Option: You can serve fresh bread later using the par-baking method. Set your oven to 425°F (220°C) and bake for 15-18 minutes until the crust sets but stays pale. Let it cool completely. The bread stays good for up to 6 hours. Finish with a final 12-15 minute bake before serving.
Classic topping combinations that enhance the sourdough flavor include:
- Sweet onion and rosemary, slowly cooked in olive oil
- Cherry tomatoes with garlic and thyme
- Potato slices with sage
- Plain sea salt and olive oil
Your focaccia is ready when its surface turns dark golden brown and makes a hollow sound when you tap the bottom. A well-baked loaf has a crispy crust and a light, airy interior with evenly spread holes.
Keep track of the temperature throughout baking. An oven thermometer helps you stay accurate since home ovens vary significantly from their displayed temperatures. Turn the pan halfway through baking to even browning, especially if your oven has hot spots.
Serving and Storing
Proper cooling and storage techniques are crucial for freshly baked sourdough focaccia quality. These final steps after baking help preserve the bread’s crispy crust and tender crumb structure.
Cooling and Slicing
The path from oven to table demands both patience and precision. Fresh focaccia needs time to cool and complete its transformation. Bakers must move the bread to a wire cooling rack right after taking it from the oven. This allows air to flow underneath and stops moisture buildup.
The cooling process has these key phases:
- Original rest period: 30 minutes minimum
- Complete cooling: 1-2 hours before storage
- Slicing temperature: Warm but not hot
A well-cooled focaccia shows these traits:
- Bottom crust stays crispy
- Interior structure sets fully
- Steam disappears completely
- Crust keeps its crackly texture
The focaccia’s signature crunchy crust will remain intact if left uncovered on the first day. The bread should rest cut-side down on the cutting board to preserve moisture on the exposed surface.
Storage Tips
Your storage choice depends on how long you plan to keep the bread and your environment. Here’s a complete guide to storage methods:
| Storage Method | Duration | Temperature | Wrapping Technique |
|---|---|---|---|
| Room Temperature | 2-3 days | 64-68°F (18-20°C) | Plastic wrap + aluminum foil |
| Refrigerated | 5-7 days | 35-40°F (2-4°C) | Airtight container |
| Frozen | Up to 3 months | 0°F (-18°C) | Double-wrapped in foil |
Room Temperature Storage
Let your focaccia cool down first. Wrap it in plastic wrap and add a layer of aluminum foil. This double protection keeps moisture balanced and shields your bread from outside elements. Store it in an excellent, dry spot away from sunlight.
Refrigeration Method
Your bread’s texture might change in the fridge, but it’s a good option to make it last longer. Here’s what you need to do:
- Wrap it well in plastic wrap
- Store it in an airtight container
- Let it reach room temperature before eating
- Heat it at 375°F (190°C) until warm
Freezing Technique
Freezing keeps your focaccia fresh the longest. Follow these steps:
- Let it cool down
- Cut it into portions if you want
- Wrap it tight in aluminum foil
- Put wrapped pieces in freezer bags
- Add date and content labels
Note: Add parchment paper between slices before freezing. This stops them from sticking and makes grabbing one piece at a time effortless.
Reheating Guidelines
Each storage method needs its reheating approach:
Room-temperature focaccia:
- Heat your oven to 375°F (190°C)
- Warm it for 5-7 minutes
- You can brush some olive oil on top before heating
Frozen focaccia:
- Let it thaw in your fridge overnight
- Set your oven to 350°F (175°C)
- Heat it in foil for 15 minutes
- Take the foil off and heat for five more minutes for a crispy top
Fresh bread tastes best during the first two days, but proper storage can extend its shelf life. Temperature and humidity levels affect how long bread stays fresh. In humid climates, you might need to adjust storage duration and add extra moisture protection.
Par-baking offers the best results if you plan to serve fresh bread later. This method requires a 15-18-minute bake at 425°F (220°C) until the crust sets but stays pale. Let the bread cool completely. You can store it for up to 6 hours and finish with a final 12-15-minute bake before serving.
Storage Warning: Never store focaccia in paper bags or cloth alone. These materials fail to protect against moisture and make the bread stale faster.
The way you reheat bread substantially affects its final texture. A light water spritz before warming frozen or refrigerated focaccia helps bring back moisture and creates a crispier crust. Air fryers work great as a reheating alternative – just 8-10 minutes at 180-200°C (356-392°F) gives perfect results.
Conclusion
Making perfect sourdough focaccia demands patience, attention to detail, and commitment to proper technique. The process builds step by step – from maintaining a healthy starter through final storage methods. This rewarding experience gives bakers exceptional results. Precise measurements, temperature control, and proper fermentation create bread with deep flavors and the signature open crumb structure that authentic focaccia is known for.
Quality ingredients determine your success with sourdough focaccia. The sourdough culture is crucial as it drives fermentation and flavor development. You can raise your bread and pizza game with an authentic artisanal sourdough starter from The Yeast We Can Do. Our small-batch starter helps passionate home bakers, and restaurant owners create exceptional bread and pizza with perfect tangy flavor and signature crust. The knowledge you gain from making sourdough focaccia becomes the foundation for learning countless other artisanal bread varieties. This versatile flatbread is an excellent starting point in any serious baker’s experience.
FAQs
What sets sourdough focaccia apart from regular sourdough bread?
Sourdough focaccia is distinct primarily because it includes olive oil, although some sourdough bread recipes might also incorporate olive oil.
Why does my sourdough focaccia turn out dense?
A common issue is the dough being too cold, which prevents the starter from effectively fermenting all the flour, leading to a denser crumb with fewer air pockets.
What should I do if my sourdough focaccia isn’t bubbly?
If the dough’s dimples recover too quickly or lack sizable bubbles, allowing it to be proof for longer can help achieve better results.
Which type of flour is ideal for making focaccia bread?
High-protein bread flour is recommended for optimal focaccia, but all-purpose flour can also be used effectively.