How to Master Sourdough Detroit-Style Pizza Recipe: A Complete Guide
Detroit-style pizza has a fascinating origin story. It wasn’t created in a traditional pizzeria but emerged from an auto parts shop where motor oil pans served as the first baking vessels.
This rectangular pizza stands out with its crispy cheese-crowned edges. What started as a humble creation has grown into one of America’s most beloved pizza variations. The original Detroit-style pizza recipe remains a classic, but we’ve elevated it by adding sourdough’s complex flavors.
Making a sourdough Detroit-style pizza at home might seem daunting. We’ve simplified every step to help both beginners and experienced bakers succeed. Our process covers everything from building your starter to achieving that perfect crispy bottom and caramelized cheese edges.
Ready to become skilled at Detroit-style pizza making? Let’s tuck into the details and turn your kitchen into a premium pizzeria!
Understanding Sourdough Pizza Basics
Let’s take a closer look at what makes a sourdough Detroit-style pizza special. You’ll find unique characteristics that set this style apart and see how sourdough takes it to the next level.
What Makes Detroit-Style Pizza Unique
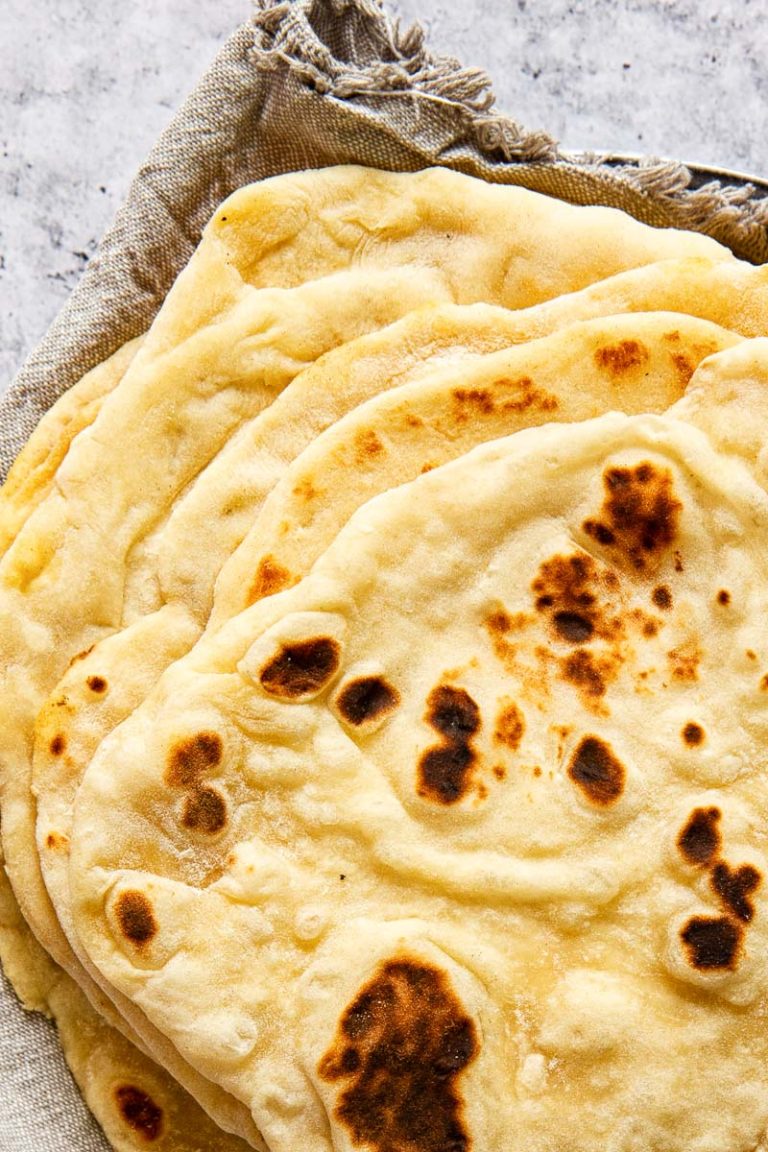
Detroit-style pizza stands out as something truly distinctive. The pizza’s rectangular shape serves as its most defining feature, traditionally baked in steel pans that create a thick, light, and airy crust. This style breaks from tradition with its reverse building technique – cheese spreads edge-to-edge directly on the dough, creating that signature crispy, caramelized cheese crust known as the “frico edge.” Thick stripes of sauce top it all off, giving rise to its nickname “red top pizza.”
Benefits of Using Sourdough
Sourdough transforms our Detroit-style pizza into something extraordinary. Commercial yeast can’t match the complex flavor profile that natural fermentation creates. Our tests found that there was improved digestibility and a more tender-yet-chewy texture with sourdough. Better gluten development happens during the extended fermentation time, which creates those coveted large air pockets in the crust.
Essential Tools and Ingredients
These items will help you create an authentic sourdough Detroit-style pizza at home:
- Pan: A 9×13-inch rectangular pan (dark-colored for better heat conductivity)
- Cheese: Wisconsin brick cheese or a blend of mozzarella and cheddar
- Flour: High-protein bread flour for optimal structure
- Starter: Active sourdough starter at peak fermentation
- Sauce: Thick, cooked tomato sauce for the signature racing stripes
Success depends on proper hydration levels – we want 68-72% hydration in our dough. The pizza’s signature light and airy interior comes from this higher moisture content combined with proper fermentation, while maintaining that famous crispy exterior.
Note that modern bakeware designed for this style works just as well as the automotive parts trays used traditionally. A perfectly crispy bottom crust needs good heat conductivity above all else.
Mastering Your Sourdough Starter
A reliable sourdough starter will set the foundation for your Detroit-style pizza experience. I’ve found that becoming skilled at managing your starter gives you that perfect balance of flavor and texture in your Detroit-style pizza dough.
Building a Strong Starter Culture
The starter needs a mix of whole grain rye and white flour. A combination of 70% medium-protein white flour and 30% whole-grain rye flour creates a very active culture. Here’s the simple feeding process:
- Remove all but 20g of your mature starter
- Add 100g of water (room temperature)
- Mix in 70g white flour and 30g rye flour
- Stir vigorously for about 5 minutes
- Cover loosely and let ferment
Maintaining Perfect Hydration Levels
Your Detroit-style pizza dough needs proper hydration. A 100% hydration starter uses equal parts flour and water by weight. This ratio will give a consistent fermentation and makes final dough hydration calculations easier. Temperature affects fermentation rates a lot – warmer environments speed up the process while cooler temperatures slow it down.
Signs of Peak Fermentation
You need to know the right moment your starter peaks to make perfect Detroit-style pizza. Here are the indicators I look for:
- Visual Signs:
- Doubles in volume within 4-6 hours
- Bubbles breaking on the surface
- Domed surface with a honeycomb structure
- Spongy appearance when viewed from the side
Your starter should have a pleasant, slightly tangy aroma. An acetone or strong vinegar smell means it needs more regular feeding. The starter works best in our Detroit-style pizza recipe right at its peak. This timing provides optimal leavening power and flavor development.
Temperature control matters especially when preparing starter for pizza dough. My starter stays at around 75°F (24°C) for consistent results. This temperature means your starter will be ready to use within 8-12 hours after feeding – perfect timing to prepare your Detroit-style pizza dough the next day.
A mature starter shows these fermentation signs consistently each day. New bakers should take their time with the process. The starter typically needs about 14 days of regular feeding to fully mature and develop its characteristic strength and flavor profile.
The Perfect Dough Development
Making the perfect dough for our Detroit-style pizza needs precision and understanding of three significant elements: hydration, fermentation, and temperature. I’ve spent years mastering these techniques and I’m excited to share them with you.
Calculating Hydration Ratios
Hydration is the life-blood of success in our Detroit-style pizza dough recipe. A 73% hydration creates the ideal balance for a light, airy crumb while maintaining enough structure. You can calculate your hydration this way:
| Flour Amount | Water Amount | Hydration % |
|---|---|---|
| 1000g | 730g | 73% |
| 500g | 365g | 73% |
Autolyze and Folding Techniques
The process starts with an autolyze period that revolutionizes our dough. I mix flour and water and let them rest for 30-60 minutes before adding other ingredients. This simple step brings remarkable benefits:
- Enhanced gluten development
- Improved dough extensibility
- Better flavor retention
- Reduced mixing time
- More uniform crumb structure
The folding phase comes after autolyze. I do four sets of stretches and folds with 15-30 minutes between each set. This technique builds strength without overworking the dough. Each fold involves stretching the dough upward and folding it over itself. The bowl rotates 90 degrees between folds.
Temperature Control Methods
Your Detroit-style pizza dough needs precise temperature management at 75-78°F (24-25°C) during fermentation. Here’s my approach to temperature control:
Cold water works well in warmer environments during the original mix. I track the dough temperature using an instant-read thermometer. The dough goes to a cooler spot or briefly into the refrigerator if it exceeds 78°F.
A proofing box or a turned-off oven with just the light on creates the perfect warm environment in colder conditions. This steady temperature helps develop optimal fermentation and flavor in our Detroit-style pizza dough.
Note that cold dough ferments slowly, while warm dough becomes sticky and overproofs quickly. The signature light, airy crumb structure of Detroit-style pizza comes from keeping the temperature just right.
Shaping and Pan Preparation
The perfect Detroit-style pizza starts with proper pan preparation and precise dough shaping. Our developed dough will become that signature rectangular masterpiece that Detroit pizza is known for.
Proper Pan Seasoning Steps
A well-seasoned pan makes that perfectly crispy crust. Here’s my tested way to season a Detroit-style pizza pan:
- Clean and dry the pan completely
- Heat the pan in a 425°F oven until dry
- Brush a thin layer of vegetable oil over entire surface
- Bake for 20 minutes until golden
- Repeat process 2-3 times to season properly
Pro tip: Coconut oil or vegetable shortening works best. They help the dough stick and make the crust crispier.
Dough Stretching Techniques
The dough needs proper fermentation before the vital stretching phase. Start by coating the seasoned pan with 2 tablespoons of oil. Make sure to cover the bottom and sides evenly. Perfect stretching needs patience and a gentle touch:
- Place the dough in the pan’s center
- Let it rest for 30 minutes, covered
- Stretch toward corners every 30 minutes
- Give it 3-4 hours to spread properly
- Use oiled fingertips to prevent sticking
Let the dough relax into the corners naturally. Never force it – you’ll damage the gluten structure we’ve built carefully.
Creating the Signature Edges
Detroit-style pizza’s trademark is its crispy, cheese-crowned edges, called the “frico crust.” My two-stage approach works great:
Push the dough up the pan’s sides first to create a slight rim. This rim catches the cheese and makes those signature crispy edges. The dough should rise about halfway up the pan’s sides – around ½ inch.
The cheese placement matters. Put it right against the pan’s edges. This step is vital because melting cheese caramelizes against the hot pan walls. That’s what creates the coveted crispy cheese crown that makes Detroit-style pizza special.
Temperature note: Keep the proofing environment at 75°F during this 3-4 hour process. This temperature lets the dough relax properly and creates those airy pockets we want in our final crust.
A well-prepared pan and shaped dough are the foundations of great Detroit-style pizza. These steps need time – rushing will affect the pizza’s quality.
Baking and Finishing Touches
The most exciting part of our Detroit-style pizza trip starts now – the baking process that brings all our preparation together to create that perfect pie.
Optimal Oven Setup
The perfect Detroit-style pizza starts with the original oven setup. My rack sits at the bottom of the oven while it preheats to 500°F (260°C). This high temperature will give a signature crispy bottom and perfectly melted cheese crown. Pizza stone users should preheat it with the oven for at least 45 minutes.
Cheese and Topping Placement
My layering technique has evolved over the last several years to make Detroit-style pizza unique. Here’s my proven method:
- Start with par-baking the crust for 8 minutes
- Add a light band of cheese around the rim
- Let the pan cool slightly
- Add remaining cheese, pressing it up the sides
- Apply sauce in two thick stripes
- Add toppings of choice
- Return to oven for final bake
Pro Tip: Pre-shredded cheese works best for the frico crust. The anti-caking agents prevent premature melting and promote better crisping.
Achieving the Perfect Frico Crust
Detroit-style pizza’s legendary frico crust makes it special. My countless tests have shown these significant elements for success:
- Press cheese firmly against the pan sides during placement
- Maintain consistent 500°F temperature throughout baking
- Watch for cheese to become golden and bubbly (about 12-15 minutes)
- Look for blackened edges as your indicator of doneness
- Allow 10-15 minutes cooling time for optimal texture
The edges where cheese meets the pan need close attention during the final bake. Deep golden brown and caramelizing cheese signals we’re getting close. The total baking time runs 12-15 minutes after the original par-bake.
Heating the sauce separately while the pizza bakes ensures perfect temperature for those signature sauce stripes. A small palette knife helps separate the crispy cheese crown from the pan edges – a technique that preserves that perfect frico crust.
Temperature management matters even after baking. The pizza needs to cool in the pan for 10-15 minutes before removal. This rest allows the interior to finish cooking through residual heat while the cheese sets perfectly. A thin metal spatula helps separate the edges from the pan. A gentle shake ensures it moves freely before serving.
Note that perfect Detroit-style pizza combines proper technique, timing, and patience. The signature crispy cheese crown, tender interior, and perfectly caramelized bottom crust make every minute of attention worthwhile.
Conclusion
Becoming skilled at sourdough Detroit-style pizza demands attention to detail and patience. The results will amaze you. My experience has taught me that success comes from understanding each significant element – from maintaining a vigorous starter to achieving that perfect frico crust.
Proper dough development, precise temperature control, and careful pan preparation build the foundation for exceptional results. The fermentation process needs respect and time. These elements create those signature crispy edges and airy crumb structure that make Detroit-style pizza unique.
Want to begin your sourdough Detroit-style pizza adventure? You can raise your bread and pizza game with an authentic artisanal sourdough starter from The Yeast We Can Do. Our small-batch starter helps create exceptional bread and pizza with perfect tangy flavor and signature crust. This applies whether you’re a passionate home baker or a restaurant owner who wants to add true sourdough’s unmistakable flavor and character to your menu.
Note that great Detroit-style pizza comes from practice and persistence. Each batch reveals something new, and you’ll develop an instinct for perfect dough consistency, timing, and temperature. Your kitchen will transform into your pizzeria that crafts Detroit-style pizzas rivaling any professional establishment.
FAQs
What type of flour should be used for Detroit-Style Pizza?
For Detroit-Style Pizza, bread flour is recommended due to its high hydration capacity, which results in a crust that is both tender and chewy, yet extra crisp. Spreading cheese to the edges of the pan enhances the crust by allowing it to brown and crisp up beautifully.
Which flour is most suitable for sourdough pizza dough?
High-protein white flour, typically containing 13-14% protein, is ideal for making sourdough pizza dough as it contributes to a chewier texture. For a less chewy crust, consider using a lower protein flour such as all-purpose or Type 00 flour.
Is it necessary to parbake Detroit-Style Pizza dough?
Yes, parbaking the dough is a crucial step. After the dough’s second rise, it should be parbaked at 550°F for 6 to 8 minutes, or just until it starts to color. Be cautious not to overbake during this stage, as it can cause the dough to shrink from the corners of the pan, leaving too much space between the dough and the edges.
How should sourdough be stretched for pizza?
When stretching sourdough pizza dough, use the outer hands to gently pull apart the dough while curving the thumbs over the crust edge. This technique helps in stretching the dough without deflating it, maintaining the airiness and structure of the crust.