Quick and Easy Sourdough Bread Schedule: Your Foolproof Timeline Guide
A surprising 76% of home bakers give up their sourdough trip due to timing problems.
The challenge is real. Bakers struggle to balance feeding schedules and monitor fermentation while timing their bakes. The process feels like solving a complex puzzle. Your dough might be over-proof because you lost track of time. You might find yourself in the kitchen at midnight waiting for the final rise.
A reliable sourdough bread schedule can revolutionize your baking experience. With a well-planned timeline, your baking process can shift from chaotic to confident. This applies whether you’re starting your first loaf or want to improve your current process.
This piece will share our tested sourdough timeline, which adapts to your daily routine. We’ll guide you through each step—from starter feeding to achieving that final golden crust. Are you ready to perfect your sourdough schedule? Let’s begin!
Understanding Your Sourdough Starter Schedule
Understanding your starter’s schedule forms the foundation of our sourdough timeline. An adequately managed starter behaves like a dependable friend who needs regular care and attention.
Signs of a Ready-to-Use Starter
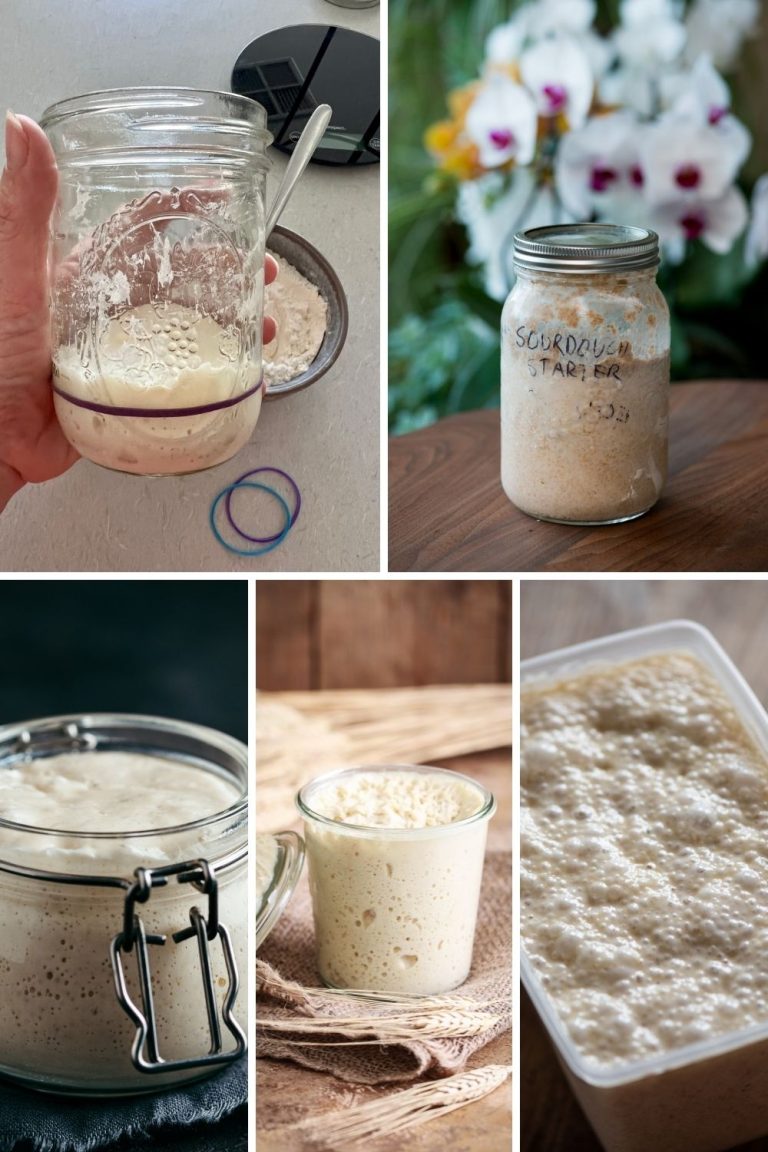
Your starter signals its readiness to bake through these reliable indicators:
- Doubles in size within 4-6 hours of feeding
- Shows large, active bubbles breaking the surface
- It has a pleasant, yeasty aroma (not acetone or cheese-like)
- Maintains a dome shape at its peak
- Displays a spongy, honeycomb texture when viewed from the side
Optimal Feeding Times and Ratios
A 1:1:1 ratio (starter:water: flour) works best for daily feedings. Your mature starter can handle a 1:3:3 ratio that offers more scheduling flexibility. Room-temperature starters need feeding twice daily at 12-hour intervals. Weekend bakers can store their starters in the refrigerator with just one weekly feeding.
Maintaining Starter Temperature
Your sourdough timeline depends on proper temperature control. To maximize activity, the ideal temperature range is between 70-80°F (21-27°C). Simple solutions help during winter months: Place the jar near a warm appliance or use the oven light (turned off). Direct heat or sunlight can damage your starter’s delicate ecosystem, so keep it protected.
Note that your starter’s behavior influences each step of your baking timeline. Time invested in understanding these simple principles leads to better baking results.
The 8-Hour Same-Day Sourdough Timeline
Want to make your sourdough experience an 8-hour adventure? Our team has perfected this same-day schedule through countless bakes. Let us share our proven timeline with you.
Morning Starter Preparation (2 hours)
Your baking day starts at 8:00 a.m. when you feed your starter with warm water (80-90°F) and bread flour in a 1:1 ratio. The workspace preparation and ingredient measurements happen while your starter activates. Your starter should show visible activity and be ready to use by 10:00 a.m.
Mixing and Folding Schedule (4 hours)
The bulk fermentation starts at 10:00 amAM with your original mix. Your proven folding schedule looks like this:
- First fold10:3amAM (after 30-minute rest)
- Second fold11:00 am
- Third fold11:30 am
- Final fold12:00 pmPM
For optimal fermentation, the dough needs to rest until 2:00 p.m. in a warm environment around 75-80°F. During this time, the dough becomes more elastic and develops a smooth surface with visible bubbles.
Final Proofing and Baking (2 hours)
Shape your dough and move it to a banneton basket at 2:00 pm. The final proof at room temperature takes about 90 minutes. During the proofing time, your oven should preheat to 500°F with a Dutch oven inside. The dough must be scored at 4:00 pm before entering the hot Dutch oven. A perfect bake takes 20 minutes to be covered and 15-20 minutes to be uncovered until golden brown.
Essential Temperature Control Tips
Temperature control can enhance or diminish your sourdough experience. Years of practice have taught us this valuable lesson. Let’s become skilled at this significant aspect of your baking schedule.
Working with Room Temperature Dough
The most consistent results come from maintaining dough temperature between 75-78°F (24-25°C). During bulk fermentation, our team monitors dough temperature with an instant-read thermometer every 2 hours. A draft-free spot ensures optimal fermentation, and our turned-off oven with just the light on serves as a makeshift proofing box.
Using Your Refrigerator Strategically
Your refrigerator becomes a secret weapon for flexible scheduling. Cold fermentation at 38-40°F (3-4°C) improves flavor and gives you control over your timeline. The dough can go into the fridge to pause fermentation, providing an extra 8-16 hours of flexibility without losing quality.
Temperature Troubleshooting Guide
Solutions to common temperature challenges include:
Too Warm (Above 82°F):
- Move dough to a more relaxed spot
- Use cold water in the initial mix
- Reduce bulk fermentation time by 25%
Too Cold (Below 70°F):
- Place near a warm appliance
- Use warmer water in the mix
- Extend bulk fermentation time
- Think about using a proofing box
Note that water or proofing temperatures should never exceed 100°F, as this can harm your yeast culture. The cold-proofed dough can go straight from the refrigerator to the oven, resulting in better scoring control and an excellent oven spring.
Time-Saving Tools and Techniques
The right tools and a tidy workspace can cut your sourdough baking time in half. We tested many equipment combinations and found that proper organization significantly affects preparation time.
Must-Have Equipment for Quick Baking
These tools are crucial to stick to our sourdough timeline:
- Digital scale for precise measurements
- Clear container to monitor fermentation
- Bench scraper to handle dough
- Dutch oven or bread cloche for perfect crust
- Parchment paper to transfer dough
Preparation Shortcuts That Work
Our mise en place system has changed how we bake. We arrange the tools in order and measure ingredients in clear containers before starting. This simple step saves precious minutes when fermentation timing matters most.
A clear, straight-sided container with measurement marks helps us track bulk fermentation. This eliminates guesswork and keeps our sourdough timeline on track. The bench scraper stays close to clean between steps and smooths the workflow.
Multitasking During Fermentation
The dough development time lets us work on other tasks. During the first rise, we clean and flour the banneton, heat the oven, and prepare scoring tools. Parchment paper slings help transfer the dough quickly without disrupting our sourdough schedule.
The refrigerator is our secret weapon for saving time. We can pause the process by moving the dough to cold storage, which gives us an extra 8-12 hours without affecting quality.
Conclusion
Mastering sourdough bread baking depends on understanding and following a reliable schedule. We’ve shown you how proper timing, temperature control, and the right tools can turn your baking experience from challenging to rewarding.
A healthy, active starter and proper planning lead to success. Each step builds upon the last – from starter feeding to bulk fermentation and final proofing to baking. You can raise your bread and pizza game with an authentic artisanal sourdough starter from The Yeast We Can Do. Our small-batch starter creates exceptional bread and pizza with perfect tangy flavor and signature crust. This makes it ideal for passionate home bakers and restaurant owners who want to add true sourdough’s unmistakable flavor to their menu. You can revolutionize your baking today by emailing john@theyeastwecando.com to get our premium sourdough starter.
Note that temperature control remains significant throughout your baking process. Our time-saving techniques and essential tools will help streamline your workflow so sourdough baking fits naturally into your daily routine.
This foolproof timeline and our proven tips will help you create beautiful, delicious sourdough bread every time. Happy baking!
FAQs
What’s an ideal sourdough baking schedule for a busy person? A good sourdough schedule for a busy person could be: Prepare levain a7:00 amm. beBeforeork, autolyze with levain a5:00 pm. after work, mix a5:20 pmm., bulk fermentation fro5:30 pmm. t9:00 pmm., divide and preshape a9:00 pmm., shape a9:30 pmm., proof fro9:45 pmm. t7:00 amm. o6:00pmm. The next day, bake at 7:00 a.m. (with oven preheating at a6:00 aa. m.m..).
How often should I feed my sourdough starter? For a daily feeding schedule, discard a portion of the starter and feed it with fresh flour and water every 24 hours. In warmer environments or for a more active starter, you can feed twice daily, approximately every 12 hours. Our article recommends starting with a 1:1:1 ratio (starter:water: flour) for daily feeding and adjusting to a 1:3:3 ratio as your starter matures.
Can you provide an overnight sourdough baking schedule? An overnight sourdough baking schedule could be as follows: Feed the sourdough starter in the morning (6 a mamt10imamm), mix the dough at night (8pmpm t10 pmpm), proof overnight, shape and bake the following day (6 mamto0 ama. Bake for 20-25 minutes or until the internal temperature reaches 200°F.
How long does it take to create a sourdough starter from scratch? It typically takes about seven days. On Day 1, you make your starter. On Day 2, you check for bubbles. Days 3-6 involve discarding and feeding. On Day 7, you feed, test, and give the starter a chance to rise and bubble for a few hours. If ready, it should double in size within 4-6 hours of feeding and show large, active bubbles breaking the surface.
What temperature should I maintain for my sourdough starter and dough? For optimal activity, keep your starter between 70-80°F (21-27°C). For the dough during bulk fermentation, aim for a temperature between 75-78°F (24-25°C). You can use simple tricks like placing the jar near a warm appliance or using the oven light (turned off) to maintain temperature. Avoid direct heat or sunlight, which can harm your starter’s delicate ecosystem.


