How to Feed Sourdough Starter: Daily Maintenance Tips
Feeding a sourdough starter is crucial to maintaining a healthy culture for baking delicious bread. Proper care and feeding ensure a vibrant, active starter that produces consistent results in your sourdough recipes. Understanding how to feed a sourdough starter is essential for both novice and experienced bakers looking to elevate their bread-making skills.
This guide covers critical aspects of sourdough maintenance, including choosing the right ingredients, setting up a feeding schedule, and monitoring starter health. Readers will learn about feeding ratios, how often to feed the sourdough starters, and tips for refreshing their culture. The article also explores advanced techniques and ways to use discard, helping bakers make the most of their sourdough journey.
Choosing the Right Ingredients
Selecting the appropriate ingredients is crucial for maintaining a healthy sourdough starter. The choice of flour and water can significantly impact the starter’s activity and overall performance.
Best flour options
Several flour options are available for feeding sourdough starters. The most common choices include:
• All-purpose flour: This versatile option is widely available and suitable for everyday baking. Depending on the brand, its protein content ranges from 9% to 12%.
• Bread flour: With a higher protein content (12% to 14%), bread flour provides more gluten potential, leading to a better starter rise.
• Whole wheat flour: Rich in nutrients and potential microbes, whole wheat flour can promote faster fermentation. However, its bran content may inhibit gluten development.
• Rye flour: Known for its high nutrient and enzyme content, rye flour enables quick sugar conversion, resulting in efficient fermentation.
Many bakers prefer using a blend of flours to achieve their desired starter characteristics. A popular combination is a 50/50 mix of whole wheat and all-purpose flour. This blend provides a good balance of nutrients and readily available food sources for the microorganisms in the starter.
Water quality considerations
The quality of water used in feeding sourdough starter can significantly impact its health and viability. Here are some key considerations:
• Chlorine content: Chlorinated tap water can harm the beneficial microorganisms in the starter. If using tap water, it’s advisable to let it sit out for a few hours to allow the chlorine to evaporate.
• Mineral content: Water hardness, the amount of dissolved minerals, can affect fermentation. Ideally, water with a hardness between 100 to 150 parts per million (PPM) is suitable for sourdough starters.
• pH level: The ideal water pH for sourdough starters is below 7. Highly alkaline water may interfere with the natural acidity created during fermentation.
Filtered tap or spring water are generally good choices for feeding sourdough starters. Avoid distilled or reverse osmosis water, as they lack the minerals necessary for proper fermentation.
Importance of consistent measurements
Accurate and consistent measurements are essential for maintaining a healthy sourdough starter. Using a digital kitchen scale to weigh ingredients ensures precision and reproducibility. Here’s why consistent measurements matter:
• Feeding ratio: The starter to fresh flour and water ratio affects the fermentation rate and starter health. Common ratios include 1:1:1 or 1:2:2 (starter:flour: water by weight).
• Hydration level: Maintaining a consistent hydration level (usually 100%, equal parts flour and water by weight) helps understand the starter’s behavior and adapt recipes accordingly.
• Reproducible results: Consistent measurements allow bakers to troubleshoot issues and make adjustments more effectively.
By paying attention to flour selection, water quality, and measurement accuracy, bakers can create an optimal environment for their sourdough starter to thrive and produce consistent, flavorful results in their baking endeavors.
Establishing a Feeding Schedule
Establishing a consistent feeding schedule is crucial for maintaining a healthy sourdough starter. The frequency of feedings depends on various factors, including temperature, usage, and storage methods.
Once vs. twice daily feedings
For a starter kept at room temperature, feeding twice a day is generally recommended. This schedule involves feeding the starter every 12 hours, typically in the morning and evening. This routine ensures the starter has a constant supply of nutrients and remains active.
However, a once-daily feeding schedule can be sufficient for those who bake less frequently. To adjust to this schedule, bakers can decrease the amount of seed starter used in each feeding. For example, if using a 1:2:2 ratio (starter:flour: water) for twice-daily feedings, switching to a 1:4:4 ratio for once-daily feedings can provide enough food for the starter to thrive over 24 hours.
It’s important to note that the feeding schedule should align with the starter’s peak activity. Observing when the starter is most active and feeding it just before it starts to decline helps maintain optimal health and vigor.
Weekend maintenance routine
A modified maintenance routine can be adopted for those who bake primarily on weekends. This approach involves storing the starter in the refrigerator during the week and reviving it for weekend baking.
A typical weekend maintenance routine might look like this:
• Friday evening: Remove the starter from the refrigerator and let it come to room temperature for a few hours.
• Friday night: Give the starter its first feeding.
• Saturday morning: Feed the starter again, preparing it for use in baking.
• Saturday afternoon/evening: Use the starter for baking, then feed the remaining portion.
• Sunday: Give the starter one final feeding before returning it to the refrigerator for the week.
This routine minimizes daily maintenance while ensuring the starter is ready for weekend baking sessions.
Adjusting for temperature fluctuations
Temperature significantly impacts sourdough starter activity and, consequently, the feeding schedule. Warmer temperatures accelerate fermentation, while cooler temperatures slow it down.
During summer months or in warmer climates, bakers might need to feed their starters more frequently or reduce the amount of starter carried over between feedings. Conversely, the feeding schedule might need to be adjusted to accommodate slower fermentation in colder months or more relaxed environments.
To maintain consistency, many bakers use proofers or find a stable spot in their home to keep their starter at a consistent temperature. The ideal temperature range for a sourdough starter is typically between 70°F and 80°F (21°C to 27°C).
By paying attention to these factors and adjusting the feeding schedule accordingly, bakers can maintain a healthy, active sourdough starter ready for use in their favorite recipes. Flexibility is critical, and observing your starter’s behavior will help you fine-tune your feeding routine for optimal results.
Monitoring Starter Health
Keeping a close eye on the health of a sourdough starter is crucial for successful bread-making. By observing visual cues, smell, and texture, bakers can determine when to feed their starter and when it’s ready for use in recipes.
Visual cues of a healthy starter
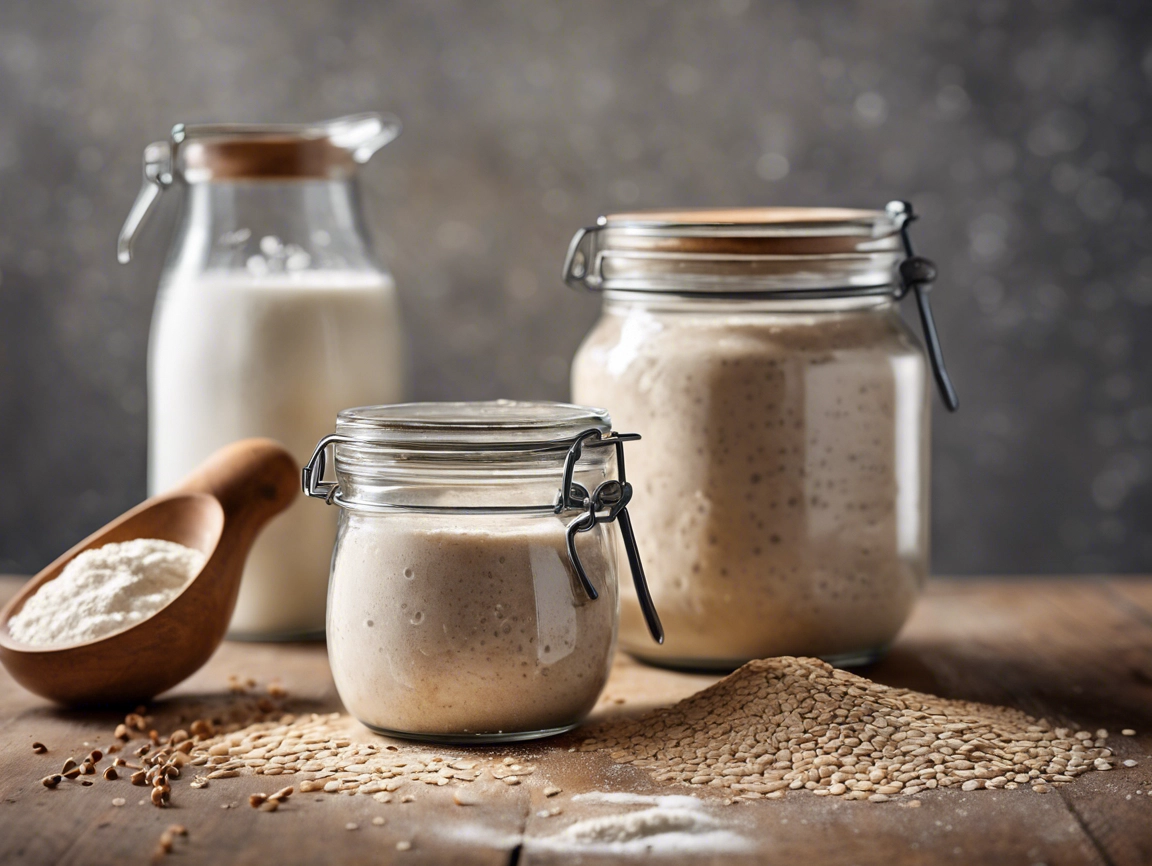
A healthy sourdough starter displays several visible signs of activity. One of the most important indicators is a consistent rise and fall pattern. After feeding, the starter should double or even triple in size within 4 to 6 hours. To track this growth, placing a rubber band around the jar at the initial level is helpful.
Bubbles are another key visual cue. A thriving starter will have bubbles on the surface and throughout the mixture. These bubbles indicate active fermentation and gas production. When viewed from the side of the jar, the texture should resemble a honeycomb, with large bubbles creating a sponge-like appearance.
A healthy starter also develops a slightly domed shape at its peak. As fermentation progresses, this dome may flatten, signaling that the starter is ready for use or needs feeding.
Smell and texture indicators
The aroma of a sourdough starter provides valuable information about its health and readiness. A ripe starter should have a pleasant, yeasty smell with a slight sourness. In the early stages of development, the scent may change from flour-like to more complex aromas.
If the starter smells strongly of acetone or alcohol or has an unpleasant odor reminiscent of gym socks or vomit, it may be a sign that it needs feeding or has become overly acidic. These smells often indicate that the starter has consumed all available nutrients and requires fresh flour and water.
The texture of a healthy starter should be thick and elastic, similar to warm peanut butter or thick pancake batter. It should have an aerated, mousse-like consistency when it doubles in size. If the starter becomes too runny or watery, it may need adjustment in its feeding ratio.
When to refresh vs. when to bake
Knowing when to refresh a sourdough starter and when it’s ready for baking is essential for maintaining its health and achieving the best results in bread-making. Generally, a starter should be refreshed when it shows signs of hunger, such as a layer of liquid (hooch) on the surface, a strong sour smell, or decreased activity.
To refresh the starter, discard a portion and feed it with fresh flour and water. Depending on the starter’s activity level and the ambient temperature, this process should be repeated every 12 to 24 hours.
A starter is typically ready for baking when it consistently doubles in size within 4 to 6 hours after feeding. It should have a pleasant, sour aroma and be full of bubbles at this stage. Some bakers use the float test, where a small amount of starter is dropped into water – if it floats, it’s considered ready for use in recipes.
By paying attention to these visual cues, smells, and textures, bakers can maintain a healthy sourdough starter and determine the optimal times for feeding and baking. Regular observation and consistent care are key to nurturing a thriving sourdough culture.
Advanced Feeding Techniques
Building starter strength is crucial for maintaining a healthy sourdough culture. One effective method is to ensure the starter receives enough oxygen. This can be achieved by covering the jar with a paper towel or coffee filter secured with an elastic band, allowing air circulation. Stirring the starter between feedings, especially twice between each feed, can also help activate it by introducing more oxygen into the mix.
Temperature plays a significant role in strengthening a sourdough starter. Keeping the starter above 75°F (24°C) can help it colonize and thrive more effectively than at cooler temperatures. For sluggish starters, increasing the feeding frequency to up to three times a day for a short period can boost activity. However, it’s important to remember to discard half the starter before each feeding to maintain balance.
Experimenting with different flours can substantially impact starter health and performance. Rye flour, for instance, is often considered a superfood for sourdough starters. It has a higher nutrient and enzyme content, enabling quick sugar conversion for more efficient fermentation. Bakers can substitute half their regular flour with rye flour at each feeding for a few days to boost a starter with rye flour. This change often results in a noticeable increase in starter activity.
Whole wheat flour is another excellent option for strengthening starters. Rich in nutrients and potential microbes, it can promote faster fermentation. Some bakers prefer using a blend of flours to achieve desired starter characteristics. A popular combination is a 50/50 mix of whole wheat flour and all-purpose flour, which provides a good balance of nutrients and readily available food sources for the microorganisms in the starter.
Adjusting hydration levels can also impact starter performance. Hydration refers to the ratio of water to flour in the starter. While many bakers maintain their starters at 100% hydration (equal parts flour and water by weight), experimenting with different hydration levels can yield interesting results. A lower hydration starter (under 100%) will be thicker and may benefit recipes that call only for sourdough starter and no additional flour, such as gluten-free sourdough pancakes.
Conversely, a higher-hydration starter (over 100%) will be more watery and can contribute to a wetter, stickier dough. Different hydration levels may require adjustments in feeding schedules, as wetter starters tend to consume their food supply more quickly and may need more frequent attention.
Conclusion
Mastering the art of feeding and maintaining a sourdough starter profoundly impacts the quality of your bread and other baked goods. By understanding the nuances of ingredient selection, feeding schedules, and health monitoring, bakers can nurture a thriving sourdough culture that consistently delivers exceptional results. This knowledge empowers home bakers to experiment with different techniques and adapt their approach to suit their unique baking needs and preferences.
The journey of sourdough baking is an ongoing process of learning and refinement. Patience and observation are crucial to success as you hone your skills. To elevate your bread and pizza game, try an authentic artisanal sourdough starter from The Yeast We Can Do – email john@theyeastwecando.com to get your hands on their premium starter. Whether you’re a novice or an experienced baker, the world of sourdough offers endless possibilities to explore and enjoy. Keep experimenting, stay curious, and savor the delicious rewards of your sourdough journey.
FAQs
What is the recommended method for feeding a sourdough starter daily?
To feed your sourdough starter daily, mix equal parts by weight of starter, water, and flour every 8-12 hours. For example, you could use 50 grams of starter, water, and flour each.
Is using a clean jar each time you feed the sourdough starter necessary?
It is not necessary to use a new jar every time. You can use the same jar daily to ensure it is kept clean. After discarding part of the starter, scrape down any residual starter from the sides and reincorporate it into the mix. Then, wipe the inside top and sides of the jar to remove any excess.
How often should the sourdough starter be fed?
You should feed your sourdough starter once every 24 hours. However, in warmer conditions or if you prefer a quicker fermentation, feeding it twice daily, about every 12 hours, is beneficial for maintaining an active starter.
What are the common feeding ratios for maintaining a sourdough starter?
For daily maintenance, popular feeding ratios are either 1:1:1 or 1:2:2. If you have 30g of existing starter, you would typically add 60g of flour and 60g of water for a 1:2:2 ratio.


