How to Make Easy Sourdough Bread: A 3-Step Recipe for Beginners
You can fill your kitchen with amazing smells by baking sourdough bread at home. Most people think you need professional skills to make crusty, flavorful sourdough. But anyone can bake it with this simple three-step method. Your homemade loaves will taste just as good as expensive bakery bread, and you’ll feel proud of what you’ve created.
Let’s explore how to make your own sourdough bread. You’ll learn everything from keeping your sourdough starter healthy to getting that perfect golden crust. We’ll cover the basics of autolyze, bulk fermentation, and proper scoring. The instructions are clear and simple, yet they stay true to authentic sourdough methods. You’ll also find solutions to common problems that might come up along the way.
What You’ll Need
You need to gather the right ingredients and equipment to start this easy sourdough bread recipe. Good ingredients and proper tools will make your sourdough baking successful.
Ingredients
Sourdough bread’s charm comes from its simplicity. You need just four essential ingredients:
| Ingredient | Specification | Notes |
|---|---|---|
| Flour | Unbleached All-Purpose or Bread Flour | Protein content 11-14% |
| Water | Filtered or Purified | Room temperature |
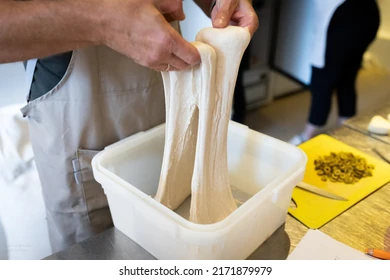
| Active Sourdough Starter | Fed within 4-12 hours | Should be bubbly and doubled in size |
| Salt | Fine Sea Salt or Artisan Salt | Avoid iodized salt |
Important Note: Your bread will turn out best with unbleached flour because bleached varieties can interfere with natural fermentation. Organic ingredients aren’t necessary, but they can boost your bread’s flavor profile.
Equipment
Essential Tools:
You need some simple equipment to make successful sourdough bread. These items will give you the best results for a perfect artisan loaf:
- Dutch Oven: Creates steam for optimal crust development
- Digital Kitchen Scale: Gives precise measurements
- Large Mixing Bowl: Works for dough preparation and bulk fermentation
- Banneton or Proofing Basket: Shapes dough during final proofing
- Bench Scraper: Makes dough handling and shaping easier
- Scoring Tool (Lame): Creates decorative cuts before baking
- Parchment Paper: Keeps dough from sticking and helps with transfer
Optional but Helpful Equipment:
These tools aren’t essential for beginners but will improve your bread-making skills:
- Bowl Covers or Plastic Wrap: Protect dough during fermentation
- Dough Whisk: Simplifies mixing
- Temperature Probe: Shows dough temperature
- Bread Knife: Cuts clean slices through crusty bread
Storage Considerations:
Your ingredients and finished loaves need proper storage. Here’s what helps:
- Glass jars with straight edges store your starter
- Bread bags or cotton storage bags keep finished loaves fresh
- Airtight containers protect flour
Sourdough baking’s equipment list might look long, but most items are regular kitchen tools. You can start with just the essential items. Your collection will grow naturally as your baking skills improve. Specialized equipment helps, but creative alternatives work well when you start your baking experience.
Step 1: Make the Dough
A successful sourdough bread starts with proper dough preparation. This significant first step creates the foundation for optimal fermentation and shapes the loaf’s final texture. Bakers can achieve professional results when they master these precise mixing and handling techniques.
Mixing the Ingredients
Start with water to control hydration levels better. Take room temperature water (68-72°F) and pour it into a large mixing bowl. The salt should dissolve in the water completely. This step will give an even distribution of salt in the dough without adding more later.
Temperature Guidelines:
| Component | Ideal Temperature |
|---|---|
| Water | 68-72°F |
| Flour | Room temperature |
| Final Dough | 75-78°F |
Mix in about half the flour until you get a porridge-like texture. This consistency helps blend the sourdough starter easily. After the starter mixes really well, add the rest of the flour and combine until all dry spots disappear. Your dough will look shaggy and a bit uneven at first.
Autolyze
The autolyze period is a significant rest phase that happens after mixing the flour and water. This simple yet effective step offers several benefits:
- Flour hydrates completely and works especially when you have whole grain components
- Gluten development starts naturally and reduces the kneading time needed
- Carotenoid pigments stay intact to enhance flavor and aroma
- Dough’s extensibility improves to allow better shaping
The dough needs to rest covered for 30 minutes to achieve optimal results. The dough changes from a rough mass into a smoother, more cohesive structure during this time. Enzymatic activity drives this transformation and proteins start forming the vital gluten network.
Stretch and Fold
The dough needs strengthening through stretch and fold movements after the autolyze period. This technique builds gluten without too much kneading and creates better texture and crumb structure.
Here’s how to stretch and fold your dough:
- Wet your hands, grab one side of the dough and stretch it upward
- Fold the stretched part over to the center
- Rotate the bowl quarter-turn
- Repeat until you’ve gone full circle (4 folds total)
Timing Note: You’ll need 3-4 sets of stretch and folds, with 15-30 minutes between each set. Your dough gets stronger and more elastic after each set. Wetter doughs do better with shorter 15-minute breaks, while stiffer doughs need longer 30-minute rests.
The dough’s texture changes as it develops. It becomes smoother and holds its shape better. You’ll feel more elasticity when you stretch it. These changes show that gluten has developed properly, which you need to create that perfect artisan loaf.
A cover protects your dough from drying between sets. The dough’s temperature should stay steady because changes can speed up or slow down fermentation. Your final stretch and fold should give you strong, supple dough with a smooth surface that stretches nicely.
Step 2: Bulk Fermentation
Bulk fermentation is a significant phase that transforms the dough and develops its characteristic sourdough flavor and structure. The process starts right after the final stretch and fold and guides the dough’s experience to become authentic artisan bread.
Room Temperature Rise
Optimal temperature conditions determine the success of bulk fermentation. The dough needs a steady temperature between 75-78°F (24-25°C) to ferment properly. Bakers can spot several visual and physical signs that show good progress:
- The surface develops a slight dome shape
- Dough edges pull away from the container sides
- The texture becomes light and airy, feeling like a pillow
- Small bubbles appear across the surface
- The volume grows by about 50-60%
Temperature Control Guidelines:
| Environment | Recommended Duration |
|---|---|
| Warm (78°F/25°C) | 2-4 hours |
| Room Temp (72°F/22°C) | 4-5 hours |
| Cool (68°F/20°C) | 5-6 hours |
Bakers should use a straight-sided container to track the dough’s growth accurately. The dough’s temperature substantially affects fermentation speed. Warmer temperatures speed up the process, while cooler conditions slow it down.
Shaping the Dough
The dough shows proper fermentation signs and becomes ready to shape. This significant step creates the foundation of the bread’s final structure. A gentle pre-shape organizes the dough’s gluten network.
Pre-shaping Steps:
- Turn the dough onto a lightly floured surface
- Perform a letter fold to create original tension
- Allow 15 minutes rest to relax gluten
- Prepare banneton with rice flour during this time
Bakers should handle the dough with confident yet gentle movements to achieve the final shape. Surface tension helps achieve proper oven spring during baking, so create it without degassing the dough too much.
The shaping technique involves several precise movements:
- Flip the rested dough smooth side down
- Stretch and fold the sides toward the center
- Roll the dough forward to create tension
- Seal the seam firmly but gently
- Transfer to the prepared banneton seam-side up
Important Considerations:
- Avoid using excess flour during shaping
- Maintain consistent, gentle pressure
- Work quickly to prevent dough from sticking
- Keep hands slightly damp to prevent sticking
The dough should feel alive and active during shaping – a sign of proper fermentation. Sticky dough or lack of structure might indicate under-fermentation or over-fermentation. Dough with proper bulk fermentation becomes easier to shape and holds its form well.
A properly shaped loaf maintains its form without spreading too much. You’ll notice these signs in a well-shaped loaf:
- A smooth, taut surface
- Rounded edges
- Slight resistance when poked
- Minimal sticking to hands or work surface
Temperature monitoring remains significant even during shaping. A warm environment makes the dough sticky and hard to handle. The dough might tighten up too much in cool conditions.
Step 3: Final Proof and Bake
Careful proofing and precise baking techniques transform shaped dough into a beautifully crusted artisan sourdough loaf. This significant phase shapes the bread’s character and determines its final texture, flavor complexity, and appearance.
Overnight Cold Proof
Cold proofing, or retarding, boosts your bread’s flavor profile and gives you more flexibility with your baking schedule. This process needs you to store the shaped dough in a refrigerator at 38-40°F (3-4°C) for 8-16 hours.
Temperature and Timing Guidelines:
| Proofing Method | Duration | Temperature |
|---|---|---|
| Cold Proof | 8-16 hours | 38-40°F (3-4°C) |
| Room Temperature | 3-4 hours | 75-78°F (24-25°C) |
The quickest way to get great results with cold proofing starts with your banneton. Put it in a plastic bag and fold the opening underneath. Your dough should rest with the seam side up. This setup creates a perfect microclimate and lets the dough’s surface develop a thin, dry skin naturally.
Important: Your proofing time directly impacts the bread’s sourness and rise. The dough becomes more sour when you proof beyond 16 hours, but you might notice less rise in your final loaf.
Scoring and Baking
The right scoring and baking techniques are vital to achieve that coveted artisan bread appearance and texture. Your process starts by preheating the oven to 500°F (260°C) with a Dutch oven inside.
Scoring Preparation:
- Remove dough from refrigerator
- Turn onto parchment paper
- Let rest for 5 minutes
- Score with confident cuts that you’ve considered
Scoring Tips for Success:
- Hold the lame at a 30-40 degree angle
- Make cuts approximately 1/4 inch deep
- Score quickly with confidence
- Your cuts should extend halfway down the ends
Perfect oven spring and crust development need the right environment. Steam is a vital part of the initial baking phase and allows the bread to expand before the crust sets.
Baking Schedule:
- Place scored dough in preheated Dutch oven
- Bake covered at 500°F for 20 minutes
- Remove lid and reduce temperature to 450°F
- Continue baking for 20-25 minutes until golden brown
Visual Indicators for Doneness:
- Deep golden-brown crust
- Hollow sound when tapped
- Internal temperature of 208-212°F (98-100°C)
Steam Generation Tips:
- Dutch oven creates natural steam environment
- Keep lid on for first 20 minutes
- Remove lid to achieve crispy crust
- The oven should stay closed during first 20 minutes
Your cold-proofed dough should display these signs of proper fermentation before baking:
- Slight increase in volume
- Surface appears taught but pliable
- Gentle poke leaves slight indentation
- Dough feels light and airy
The bread’s internal temperature needs monitoring during the final minutes. The temperature will plateau at 212°F (100°C), and should stay there for several minutes to ensure complete baking. The crust develops its color and complexity during this final phase, creating that signature artisan appearance.
Temperature Monitoring Guidelines:
- Check internal temperature after 35 minutes
- Ensure consistent reading of 208-212°F
- Allow additional time if needed
- Monitor crust color development
Cold proofing, precise scoring, and a controlled baking environment work together to create ideal conditions for exceptional oven spring and crust development. The correct execution of these essential steps produces an artisan sourdough loaf that features distinctive flavors and stands out with its impressive appearance.
Troubleshooting Common Issues
Sourdough bread challenges test the skills of experienced bakers. Bakers achieve consistent success by understanding common problems and their solutions. This complete guide helps troubleshoot the most frequent problems that occur during the sourdough baking process.
Dough Too Wet
Wet, sticky dough can frustrate even experienced bakers. The solution to managing dough consistency comes from understanding proper hydration and flour absorption rates. Bakers should think over these factors when their dough feels too wet:
Why It Happens:
- Too much water in the original mix
- Wrong flour protein content
- High humidity environment
- Dough that fermented too early
Bakers can fix wet dough by adding small amounts of flour (1 teaspoon or 3 grams per cup of flour) as they mix. It’s significant to let the dough rest 5-10 minutes between additions because flour needs time to absorb moisture completely.
| Hydration Level | Characteristics | Best For |
|---|---|---|
| 65-70% | Easiest to handle | Beginners |
| 70-75% | Moderate difficulty | Intermediate |
| 75-80% | Challenging | Advanced |
Bread Not Rising
Your bread’s poor rise typically results from problems with the sourdough starter or fermentation conditions. These issues can demonstrate themselves at various stages while you bake.
Key Indicators of Starter Health:
- Doubles in size within 4-8 hours
- Shows consistent bubbles throughout
- Passes the float test
- Maintains spongy texture
Temperature is a significant factor that affects fermentation. Your dough needs to stay between 75-78°F (24-25°C). Bakers working in colder environments can:
- Use warmer water (80-90°F) during mixing
- Create a makeshift proofing box using the oven light
- Extend fermentation time appropriately
- Monitor dough temperature regularly
Dense Crumb
Your bread’s dense crumb usually happens because of low yeast activity or poor dough development. Several factors work together to create this problem.
Common Dense Crumb Causes:
- Under-proofed dough
- Weak starter activity
- Poor gluten development
- Wrong baking temperature
Here’s a step-by-step solution that works:
Starter Management:
- Feed your starter at its peak activity
- Keep your feeding schedule steady
- Choose unbleached flour for feeds
- Your dough needs to double in size
- The surface should feel springy
- A gentle poke leaves a slow-recovering dent
- Keep track of room temperature
- Change proofing time based on your kitchen’s warmth
- Cold weather needs warm water
Gluten Development:
- Do enough stretch and folds
- Give proper autolyze time
- Watch how your dough’s strength builds
Great bread needs you to understand your dough’s behavior. Practice and careful watching help you learn how dough reacts in different situations. Temperature affects everything from your starter’s strength to the final proof.
Professional Tips for Consistent Results:
- Pick a clear container to watch fermentation
- Put a mark to track your dough’s rise
- Keep good notes about temperature and time
- Change your recipe with the seasons
Look at your whole process to fix dense crumb problems. Each step in sourdough baking connects to the next. Understanding these connections helps you make smart changes to your method.
Winter months need extra attention to temperature. Your kitchen’s warmth changes a lot during this time. You might need to:
- Let bulk fermentation run longer
- Use water that’s a bit warmer
- Make a special proofing spot
- Check dough temperature more often
Success comes from watching carefully and making small changes. Good notes about room temperature, timing, and dough behavior help spot patterns. This information guides you to make the right adjustments for your easy sourdough bread recipe.
Conclusion
Making great sourdough bread needs basic techniques more than complex methods. Bakers who pay attention to temperature control, proper fermentation, and careful dough handling get excellent results consistently. You can create professional-quality loaves at home through steady practice and a solid grasp of core principles. This proves that artisan bread making has a place in every kitchen.
Each perfect loaf builds your confidence and adds to this timeless craft’s beauty. Quality ingredients and proper guidance help bakers advance their artisan bread skills – Lift your bread and pizza game with an authentic artisanal sourdough starter from The Yeast We Can Do. You will find the learning process rewarding when you pull a perfectly crusted, flavorful loaf from your oven, which encourages you to keep growing in this achieving pursuit.
FAQs
What is the key to maintaining a healthy sourdough starter?
The optimal temperature for a sourdough starter is between 75-80ºF (24-27ºC). At these warmer temperatures, the starter ferments more rapidly, requiring more frequent feedings. Additionally, the starter may develop a more acidic flavor in warmer conditions.
What are the essentials for creating a sourdough starter?
To begin your sourdough starter, you will need the following items: various types of flour, water (tap water is sufficient), a bowl made of glass, plastic, or ceramic, or a quart-sized mason jar, a kitchen scale, a spatula, and a cheesecloth or kitchen towel to cover the bowl.
What is the secret to achieving great sourdough bread?
The secret to excellent sourdough bread lies in its water content. Increasing the amount of water in your dough influences the texture, resulting in a more open crumb with larger holes and a softer overall texture.
How can you produce a sufficient amount of sourdough starter?
While there is no definitive ratio for creating sourdough starter, a commonly effective method involves using a 1:5:5 ratio, fed twice daily at 12-hour intervals. This involves maintaining 20% of the ripe starter, with equal parts of water and a mix of whole grain rye and white flour at each feeding to ensure a robust and active starter.