How to Master High Hydration Sourdough Technique: 80%+ Hydration Guide
High-hydration sourdough stands out as one of the most challenging and rewarding techniques in artisan bread making. Bakers who become skilled at this advanced method can create loaves that showcase exceptional open crumb structure and superior flavor development. The technique needs precision, patience, and a proper grasp of dough mechanics.
This complete guide breaks down the steps of the high hydration process, from picking the right flour combination to mastering stretch and folds. You will learn everything, including autolyzing, proper bulk fermentation timing, and specialized shaping techniques for wet dough. The guide also explains significant elements like starter maintenance, dough temperature control, and scoring patterns that help achieve maximum oven spring.
Mastering the Basics of High Hydration
The mathematics behind sourdough hydration are the foundations of exceptional artisan bread making. Bakers calculate hydration percentages based on the water-to-flour weight ratio in their recipes.
Hydration percentages explained
Bakers calculate hydration using this simple formula: (Water Weight ÷ Flour Weight) × 100 = Hydration Percentage. For example, a recipe with 500g of flour and 400g of water results in an 80% hydration level. Bakers must include their starter’s water and flour content when calculating total hydration, as these elements affect the final hydration percentage.
High-hydration sourdough (80%+) brings several unique benefits:
- Natural development of thinner, crispier crust
- Faster fermentation process
- Better potential for open crumb structure
- Superior shelf life and moisture retention
Flour selection and absorption rates
The quality of high-hydration dough relies on proper flour selection. Strong bread flour with a protein content between 12.5% and 15% gives you the strength needed for higher water content. Each flour type absorbs water differently:
| Flour Type | Typical Absorption Rate |
|---|---|
| Bread Flour | 60-66% |
| Whole Wheat | 65-70% |
| Rye Flour | 70-75% |
Whole-grain flours absorb more water than white flour varieties, so you must adjust hydration levels accordingly. Bakers should use strong bread flour as their base and add whole-grain flour step by step to understand how it affects dough consistency.
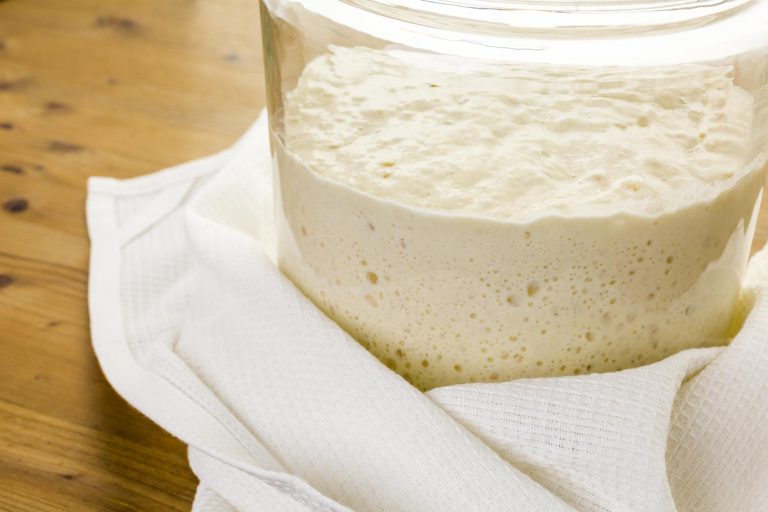
Building a solid sourdough starter
A reliable starter is the lifeblood of successful high-hydration bread. Your starter’s consistency in fermentation improves at 100% hydration with equal parts flour and water, which makes hydration calculations straightforward. The starter performs better in high-hydration doughs if you feed it with a mix of bread and whole-grain flour that boosts enzymatic activity.
Your feeding schedule is vital to preparing for high-hydration bakes. A vigorous culture that manages increased moisture levels needs a 1:5:5 ratio (one part starter, five parts water, five parts flour) fed twice daily at 12-hour intervals. The starter develops better yeast activity and bacterial growth at around 80°F (26°C).
Bakers should gradually increase water content as they move to higher hydration levels. This approach helps them develop proper handling techniques. Starting at 70% hydration and rising by 2-3% per bake improves their confidence and understanding of dough behavior at different moisture levels.
Preparing Your High-Hydration Dough
Proper dough preparation techniques form the base of a high hydration sourdough. The original steps will give you optimal gluten development and dough strength that you need to handle wet dough while baking.
Autolyze technique
The autolyze process is the lifeblood of high-hydration sourdough preparation. This significant step combines flour and water that rest before adding other ingredients. The flour hydrates thoroughly, and gluten development begins naturally during this period. The process results in:
- Better dough extensibility
- Less mixing time
- Better flavor retention
- Superior dough handling properties
Bakers should follow these autolyze timing guidelines to achieve the best results:
| Flour Type | Recommended Autolyze Duration |
|---|---|
| White Bread Flour | 30-60 minutes |
| Mixed Flour Blend | 45-90 minutes |
| High Whole Wheat | 2-4 hours |
Incorporating the levain
The timing of adding levain to high-hydration dough is significant. The optimal window comes when the levain passes the float test, typically 8-12 hours after building it. A well-prepared levain should bubble throughout and show peak activity.
Bakers should use a 1:2:2 ratio (one part starter to two parts flour and water) to achieve consistent results. This ratio will give adequate strength and help you retain proper hydration levels in the final dough. The levain’s temperature should stay around 80°F (27°C) during development and should never go above 90°F (32°C).
Salting and original mixing
Salt helps develop dough, and most high-hydration recipes need 2-3% salt based on flour weight. The way you mix salt affects your dough’s final structure. Here’s what you should do:
- Add salt after the autolyze period
- Keep 50g of mixing water aside to dissolve the salt
- Mix it in slowly with the massage technique
- Use gentle squeezing motions for even distribution
Your dough needs careful attention during the first mixing phase to mix well without overdoing it. The bassinage (double hydration) technique lets you add water slowly. This prevents your dough from getting too sticky and helps build good structure. This works great with dough that has more than 80% hydration.
Once you’ve added the salt, the dough needs gentle folding to develop strength. You’ll need about 20-25 stretches to create a solid mass. This results in a smooth, shiny dough ready for bulk fermentation.
Developing Structure in Wet Dough
High-hydration sourdough needs special techniques to build strength. The key is to work with the dough’s wet nature instead of fighting against it. A well-developed dough creates the perfect base, leading to an excellent oven spring and the desired open crumb structure.
Coil folding method
The coil fold technique is the gentlest and quickest way to build strength in wet dough. This approach works best, especially with doughs above 75% hydration. Bakers can efficiently perform coil folds by following these steps:
- Wetting hands to prevent sticking
- Lifting dough from the center
- Letting it naturally elongate
- Coiling the stretched portion under itself
- Rotating the container 90 degrees
- Repeating the process on all four sides
The best results come from performing 4-6 coil folds during the first 2-3 hours of bulk fermentation. The dough’s development shows success when it:
- Maintains its shape after folding
- Displays better elasticity
- Creates a smooth, aerated texture
- Shows clear surface tension
Lamination technique
Lamination builds dough strength and allows you to add more ingredients. Bakers start this technique when the dough shows enough elasticity, usually after 2-3 sets of coil folds. The process follows these steps:
| Step | Action | Purpose |
|---|---|---|
| 1 | Spread dough on a wet surface | Creates a large working area |
| 2 | Stretch until translucent | Develops gluten network |
| 3 | Fold in thirds horizontally | Builds dough strength |
| 4 | Fold in thirds vertically | Creates uniform layers |
The technique works best with doughs at 70% hydration or higher, creating extra strength through the dough’s surface tension development. Wet doughs benefit from this method, which can replace pre-shaping steps.
Monitoring bulk fermentation
Successful bulk fermentation depends on closely monitoring time and temperature. Throughout this stage, your dough needs to stay at 75-80°F (24-27°C). Several indicators tell you how the fermentation progresses.
The dough volume should almost double. You’ll notice changes in the surface texture and bubbles forming just below it. The dough pulls away from the container’s sides and develops a dome-like top.
Bulk fermentation usually takes 4-6 hours, but this varies with room temperature and your starter’s strength. Time alone shouldn’t be your guide – visual and touch cues are better indicators. A properly fermented dough feels light and pillow-like.
Temperature control is vital during this stage because changes can substantially affect how fast your dough ferments. A straight-sided container helps you track volume increases accurately. The aliquot jar method offers precise monitoring through a separate dough sample.
Proper bulk fermentation becomes the foundation of successful shaping and final proofing in high-hydration doughs. Your dough should show strength while staying stretchy, which sets it up perfectly for the vital pre-shaping step ahead.
Shaping and Baking Hydration Loaves
The final stages of high-hydration sourdough require precise techniques and attention to detail. These steps reshape the scene when the well-developed dough becomes exceptional artisan bread with its characteristic open crumb structure.
Pre-shaping and bench rest
High-hydration dough must perfectly balance tension building and degassing prevention during pre-shaping. Bakers achieve better results with a wet pre-shape technique and follow it with a floured final shape. The process works best this way:
- Water mist should lightly cover the work surface
- A gentle touch helps create the original structure
- The dough needs 20-30 minutes to rest on the bench
- The dough should remain uncovered during rest
- The dough temperature should stay at 75-78°F
Wet dough’s bench rest time is crucial because it lets the gluten relax enough before final shaping. You’ll know your dough has rested properly when it spreads gently without looking too slack or losing its round shape.
Final shaping techniques
High-hydration dough requires careful final shaping to create surface tension without damaging the developed gluten network. The dough must show enough strength from previous development to maintain its extensibility.
Temperature control is a vital part of the shaping process:
| Stage | Optimal Temperature | Duration |
|---|---|---|
| Shaping Environment | 72-75°F | Throughout process |
| Dough Core | 75-78°F | During handling |
| Final Rest | 76-80°F | 15-20 minutes |
Proper dough strength and careful handling eliminate the need for minimal flour during final shaping. A smooth outer skin develops naturally and supports the dough through proofing, creating ideal conditions for scoring.
Proofing and cold retardation
Cold retardation improves flavor development and provides better control over the final proof. The best temperatures for high hydration doughs range between 45-48°F. The process works best with this sequence:
- Shape loaves quickly with minimal bench time
- Place in well-floured bannetons
- Cover adequately to prevent skin formation
- Retard for 12-15 hours
- Monitor dough development
Wet dough needs careful attention to proofing indicators. Bakers should watch for:
- Visible bubbles forming beneath the surface
- Gentle dough relaxation in banneton
- Slight spring-back from pressing
- Surface tension that managed to keep its form
- Consistent temperature throughout
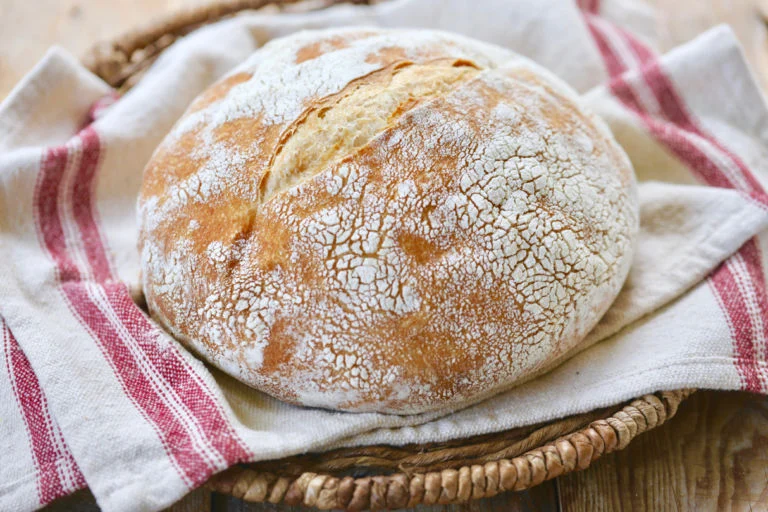
Scoring and baking methods
You’ll face unique challenges when scoring high-hydration dough, especially when your hydration levels are above 80%. Your success depends on a dry surface and quick, confident movements. Keep the scoring shallow at ¼ inches with a 30-45-degree angle.
Your bread needs specific techniques to achieve the best results:
- Preheat a Dutch oven or baking stone to 480°F
- Create initial steam burst to last 15 minutes
- Reduce temperature to 400°F after steam phase
- Monitor crust development
- Ensure complete bottom baking
The best oven spring comes from consistent steam during the first baking phase. A preheated Dutch oven creates the perfect environment and traps moisture naturally released from the dough. You can also use a baking stone with steam pans, which needs careful timing and temperature control.
Your choice of baking vessel will shape your final results. Enameled cast iron retains heat well and generates steam effectively. Ceramic bakers deliver similar results with gentler heat transfer. Both options help create that crackling crust that makes high-hydration sourdough special.
Conclusion
Becoming skilled at high-hydration sourdough requires a deep commitment to exact techniques, careful temperature control, and a solid grasp of dough mechanics. Each step connects to the next one and creates a series of key decisions that shape the quality of your final loaf. The right flour choice, proper starter care, and special handling methods combine to make bread with an amazing open crumb structure, rich flavors, and that perfect crispy crust.
You can master high-hydration sourdough through patient practice as you slowly reach higher hydration levels. Bakers who want to start this exciting experience need good ingredients and guidance. The Yeast We Can Do’s authentic artisanal sourdough starter is a great way to get outstanding bread and pizza with perfect tangy flavor and signature crust (email john@theyeastwecando.com for this premium starter). With proper techniques and quality ingredients, you can consistently make artisan-quality bread that helps realize the full potential of high-hydration sourdough.
FAQs
What does it mean when sourdough is described as 80% hydration?
80% hydration in sourdough refers to the ratio of water to flour by weight, where the water weight is 80% of the flour weight. This is calculated using the baker’s percentage, which helps bakers standardize recipes regardless of batch size.
How can I enhance the structure of high-hydration sourdough?
Folding techniques during the fermentation process are crucial for improving the structure of high-hydration sourdough. This strengthens the dough, making it easier to shape and handle, and contributes to a better oven spring and a more open crumb in the final bread.
What is the ideal hydration level for sourdough bread?
The ideal hydration for sourdough bread can vary widely, typically from 60% to 90%. While some bakers prefer around 70% hydration, anything above 80% is considered high hydration. The choice of hydration level depends on the desired texture of the bread and personal preference.
Does sourdough with high hydration require longer proofing times?
Contrary to what might be expected, high-hydration sourdough often ferments faster than lower-hydration doughs. Several factors, including the maturity of your sourdough starter and the ambient conditions, can influence the proofing duration. Over-fermentation can lead to a sticky and difficult-to-handle dough.
How does changing the hydration level affect sourdough bread?
Adjusting the hydration level in sourdough bread affects the texture and handling of the dough—lower hydration results in a denser, less sticky dough that is easier to shape. As hydration increases, the dough becomes stickier and more challenging to work with, but it can yield a loaf with a more open crumb and lighter texture. Finding the right balance often involves experimentation with different hydration levels to suit your specific ingredients and climate conditions.
Can you provide a basic recipe for an 80% hydration sourdough loaf?
Certainly! For an 80% hydration loaf, you might start with 500g of flour and 400g of water. Mix these and let them autolyze for 2 hours. Then, add 100g of starter and perform a stretch and fold at 45-minute intervals. After the final series of coil folds, allow the dough to ferment until it achieves the right consistency, which can vary based on temperature. Shape the dough, place it in a banneton, and let it cold-proof overnight. Bake it in a preheated Dutch oven at 450 degrees Fahrenheit for 30 minutes, adding steam via ice cubes, and finish with