The Essential Guide to Perfecting Sourdough Bulk Fermentation
Did you know that 80% of home bakers struggle with their sourdough’s bulk fermentation stage?
Every baker has experienced it—that uncertain moment of staring at their dough and wondering about the rise. Our years of baking experience and numerous loaves taught us that becoming skilled at sourdough bulk fermentation combines scientific precision and artistic intuition.
Perfect sourdough bread requires more than a robust starter or recipe adherence. Temperature, time, and environment work together during this vital fermentation period. The right approach to fermentation makes all the difference – whether you choose overnight refrigeration or room temperature monitoring. Your reward? A loaf with perfect holes and crispy crust instead of a dense, flat result.
Want to revolutionize your sourdough results? Let’s explore the essential steps to perfect your bulk fermentation process.
Understanding Bulk Fermentation Basics
Let’s explore the fascinating world of bulk fermentation – the real magic of sourdough bread making. This significant phase starts when we mix our levain into the dough and continues until shaping.
What Happens During Bulk Fermentation
During this stage, our dough undergoes a remarkable change. Wild yeast metabolizes sugars to produce carbon dioxide and ethanol, while beneficial bacteria create complex flavor compounds we love in sourdough. Picture a microscopic dance party where yeasts and bacteria collaborate to develop our bread’s character.
KeyCriticalages of the Process
Several indicators show that our bulk fermentation is on track:
- The surface texture becomes smooth with visible bubbles
- The dough develops a slightly domed surface
- Volume increases by about 30-50% (though this varies with temperature)
- Texture transforms from sticky to tacky
- Edges begin pulling away from the container
Why Temperature Matters
Temperature is the most critical factor in successful bulk fermentation. Different temperature ranges affect our dough in unique ways:
| Temperature Range | Effect on Fermentation |
|---|---|
| 75-78°F (24-25°C) | Optimal fermentation rate |
| Below 70°F (21°C) | Slower fermentation, more flavor development |
| Above 80°F (27°C) | Faster fermentation, risk of over-proofing |
Maintaining a consistent temperature between 75-78°F (24-25°C) is the best balance between fermentation speed and flavor development. This range allows our dough to develop strong gluten networks while giving enough time for complex flavors to emerge.
Note that the fermentation rate roughly doubles for every 15°F increase in temperature. This means timing becomes more critical in warmer conditions. Consistency is key—steady temperature throughout bulk fermentation helps achieve reliable, repeatable results in our sourdough baking experience.
Essential Equipment and Setup
The right tools and environment make all the difference in sourdough baking success. Our experience shows that good equipment leads to consistent bulk fermentation results.
Choosing the Right Container
Your container choice should match both material and size needs. A 2-quart ceramic bowl or a clear straight-sided container works best for single-loaf batches. Different materials offer unique advantages:
| Container Material | Benefits |
|---|---|
| Ceramic | Maintains steady temperature, non-reactive |
| Glass | Easy to monitor progress, durable |
| Plastic (Cambro) | Lightweight, measured markings |
Your container should fit a 30-40% rise in dough volume. A 2-quart container perfectly suits a standard 1000g flour-weight recipe.
Temperature Control Tools
Our must-have temperature management tools are:
- A reliable instant-read thermometer (we recommend Thermapen)
- A temperature-controlled proofer (Brod & Taylor or IVYX Scientific)
- Backup heating/cooling options (warm oven light or refrigerator)
A dedicated proofer that heats and cools changed everything for us. We keep our dough at 75-78°F (24-25°C), the sweet spot for optimal fermentation.
Creating the Ideal Environment
Perfect fermentation needs more than just temperature control. Our setup features a dedicated space away from drafts that helps maintain consistent conditions. We track our dough’s progress with a marked container. A proper lid or cover prevents the dough from drying and controls humidity.
Pro tip: Keep temperature monitoring tools near your fermentation vessel and check them often. Quick adjustments become easier if conditions change from ideal ranges.
A small home proofer proves its worth in challenging environments. It gives you the control needed for consistent results, especially during seasonal changes.
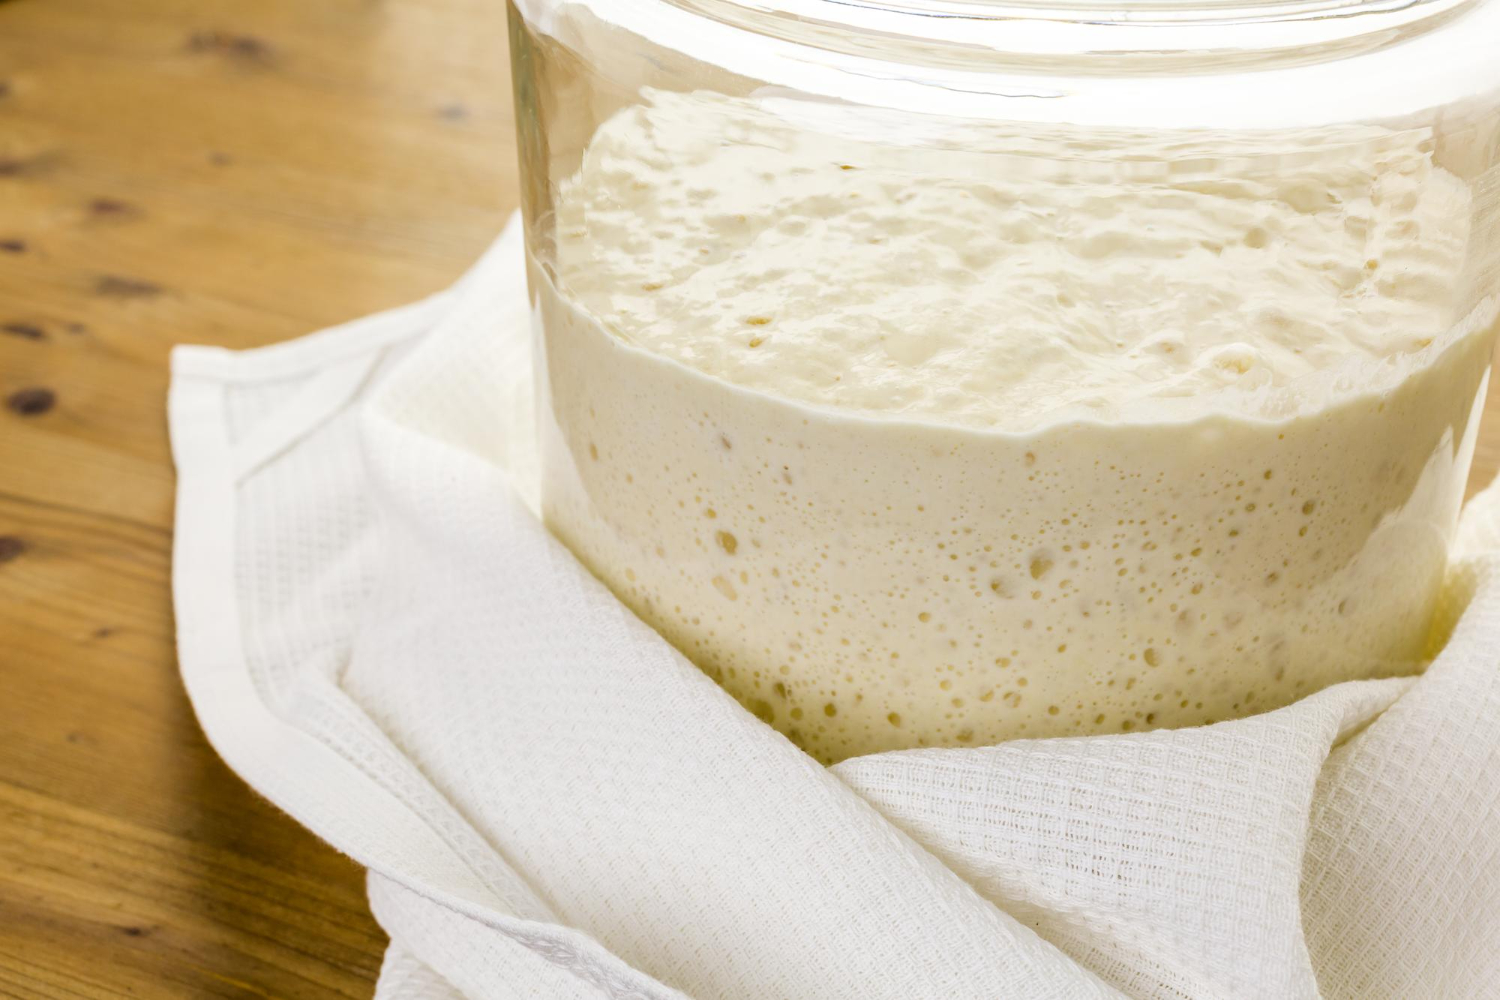
Visual Signs of Proper Fermentation
Becoming skilled at reading visual signs of proper fermentation is like reading a map – once you know what to look for, you’ll never get lost. We found that successful bulk fermentation leaves clear visual signatures that tell us exactly when our dough is ready.
Surface Texture Changes
The dough transforms from a rough, shaggy mass into something smooth and almost silky. Its surface develops a slight sheen and appears domed rather than flat. When lifted, the dough moves as one cohesive unit, showing developed gluten strands beneath.
Bubble Development Patterns
Our clear container lets us see what I love – the development of bubbles that show active fermentation. We look for:
- STiny, evenly distributed bubbles throughout the dough
- Visible gas pockets when viewing from the sides
- A gentle jiggle when the container is slightly moved
Edge and Volume Indicators
The dough’s relationship with its container reveals much about fermentation progress. Here’s what we monitor:
| Indicator | Properly Fermented Signs |
|---|---|
| Volume | 30-50% increase from original size |
| Edge separation | Dough pulls away from container sides |
| Surface dome | Smooth, slightly rounded top |
Proper fermentation shows itself when the dough becomes light and airy and feels like a giant pillow. A straight-sided container helps track volume increase precisely— we mark the starting level with a marker to monitor progress.
Pro tip: A small dough sample in a separate glass container is an excellent visual gauge. When this sample doubles, the main dough is typically ready for the next step.
Note that these visual cues work together – no single indicator tells the whole story. A combination of surface smoothness, bubble development, and volume increase confirms proper fermentation.
Common Problems and Solutions
Our sourdough baking journey has taught us a lot about fermentation challenges. Years of trial and error helped us develop reliable fixes for common problems home bakers face during bulk fermentation.
Under-fermentation Signs
Dense, gummy bread with a tight crumb structure often points to under-fermented dough. When we cut bulk fermentation short, the crumb shows tunneling or a marked dome shape after baking. Here’s what works for us:
- Add 30-60 minutes to fermentation time
- Place dough somewhere warmer
- Verify starter activity before mixing
Over-fermentation Issues
Over-fermented dough tells its own story. We spot it right away from its sticky texture and weak gluten structure. The dough tears easily during shaping and smells too sour. These fixes work well:
| Problem | Solution |
|---|---|
| Sticky dough | Reduce hydration in the next batch |
| Weak gluten | Shorten bulk time, handle gently |
| Sour smell | Decrease starter percentage |
Temperature-related Challenges
Temperature control gives us the most power over fermentation. We’ve found that fermentation speed doubles with every 15°F increase. Here’s how we handle temperature issues:
Too-warm environments (above 80°F):
- Mix dough with cold water
- Put the container in a cool box with ice packs
- Use less starter to slow fermentation
Too-cool conditions (below 70°F):
- Add warmer water to the mix
- Look for a warmer kitchen spot
- Try using a proofing box
Pro tip: Steady temperature matters more than perfect temperature. Instead of waiting for problems, we move our dough to a cooler spot as soon as it ferments too fast.
Experience shows that gooreasonablemperature control prevents most fermentation issues. Keeping dough between 75-78°F helps us avoid serious problems.
Regional Climate Adaptations
Our work with sourdough in various climates shows that bulk fermentation requires different approaches based on local conditions. The last several years of testing and countless experiments have led us to develop reliable strategies that work in any environment.
Humid vs. Dry Climate Adjustments
Dough absorbs moisture from the air in humid environments, so we must carefully adjust hydration. We reduce water content by 2-5% from our standard recipe when humidity hits 80-96%. The dry climate scenario with humidity below 20% needs these adjustments:
- Increase hydration by 25g increments
- Use dough covers to prevent moisture loss
- Create a humid microclimate with a bowl of warm water nearby
Seasonal Temperature Strategies
A seasonal approach helps maintain consistent bulk fermentation year-round:
| Season | Temperature Strategy |
|---|---|
| Summer | Use cold water (-10°F from recipe temp) |
| Winter | Extend bulk time by 1-2 hours |
| Spring/Fall | Standard recipe adjustments |
The refrigerator works well for overnight bulk fermentation during extreme temperature swings and gives us better control. Temperature consistency proves more valuable than perfect temperatures.
High Altitude Considerations
Bulk fermentation faces unique challenges above sea level. Lower air pressure at higher altitudes makes gasses expand faster, which speeds up fermentation. These adjustments help at high altitudes:
- Decrease bulk fermentation time by 15-minute increments
- Reduce starter percentage to slow fermentation
- Increase hydration to compensate for drier air
- Add extra stretch-and-folds to develop gluten strength
High-altitude locations typically show humidity levels of 10-20%, while sea level stays around 80%. This difference requires adding up to 50g more water after autolyzing.
Pro tip: Small adjustments work best when adapting to a new climate. Keep detailed notes about temperature, humidity, and fermentation times. This approach helps perfect the process for each unique environment.
Conclusion
Skilled at sourdough bulk fermentation takes patience, practice, and attention to detail. Countless bakes have taught us the delicate balance between temperature, time, and environmental factors.
Proper equipment setup, careful monitoring of visual cues, and smart adaptations to local climate conditions consistently produce consistent results. The final bread quality depends on small adjustments in hydration, timing, and temperature management.
Are you ready to begin your sourdough experience? You can raise your bread and pizza-making skills with an authentic artisanal sourdough starter from The Yeast We Can Do. Our small-batch starter creates exceptional bread and pizza with perfect tangy flavor and signature crust. This works greexcellentr passionate home bakers and restaurant owners who want to add true sourdough’s unmistakable flavor and character to their menu. You can reshape your baking scene today – email john@theyeastwecando.com to get our premium sourdough starter.
Note that perfect bulk fermentation comes from practice and observation. Each loaf brings valuable lessons that help refine our technique and understanding. When adapted to your environment, these fundamentals will help your sourdough skills flourish.
FAQs
How long should the bulk fermentation process take for sourdough? The bulk fermentation process typically takes 2 to 5 hours. However, the exact time can vary depending on factors such as temperature, humidity, and the strength of your starter. It’s important to monitor the visual cues of fermentation rather than rely solely on time.
Is it necessary to perform stretch and folds during bulk fermentation? Stretch and folds can be beneficial during bulk fermentation, especially if the dough wasn’t fully developed during initial mixing or kneading. This technique helps strengthen the gluten network, allowing the dough to trap gas better and maintain its shape. However, it’s not always necessary if your dough has been well-developed.
What visual signs indicate proper bulk fermentation? During proper bulk fermentation, you should observe several changes in your dough:
- The surface texture becomes smooth with visible bubbles
- The dough develops a slightly domed surface
- Volume increases by about 30-50%
- The texture transforms from sticky to tacky
- Edges begin pulling away from the container
Should the dough double in size during bulk fermentation? Contrary to common belief, your dough doesn’t need to double in size during bulk fermentation. Allowing it to rise by 30-50% is often sufficient. Letting the dough double can lead to over-fermentation, negatively impacting the final bread structure and flavor.
How does temperature affect bulk fermentation? Temperature is a critical factor in bulk fermentation. The optimal temperature range is between 75-78°F (24 and 25°C). Lower temperatures (below 70°F/21°C) result in slower fermentation and more flavor development, while higher temperatures (above 80°F/27°C) speed up fermentation but risk over-proofing. Remember, the fermentation rate roughly doubles for every 15°F increase in temperature.
What equipment is essential for successful bulk fermentation? Essential equipment for bulk fermentation includes:
- A suitable container (ceramic, glass, or food-grade plastic)
- A reliable instant-read thermometer
- A temperature-controlled proofer (optional but helpful)
- A clear, straight-sided container for easy monitoring
- How can I adapt my bulk fermentation process to different climates? Adapting to different climates involves adjusting hydration, fermentation times, and temperature control:
- In humid climates, reduce water content by 2-5%
- In dry climates, increase hydration and use dough covers to prevent moisture loss
- In summer, use colder water and potentially shorter fermentation times
- In winter, extend bulk fermentation time and use slightly warmer water
- At high altitudes, decrease fermentation time, reduce starter percentage, and increase hydration
- What are common problems during bulk fermentation, and how can I solve them? Common problems and solutions include:
- Under-fermentation: Extend fermentation time, move to a warmer spot, or check starter activity
- Over-fermentation: Reduce hydration in the next batch, shorten bulk time, or decrease starter percentage
- Temperature issues: Use cold water for warm environments, find a warmer spot, or use a proofing box for excellent conditions. Consistent temperature control and careful observation are crucial to avoiding most fermentation issues.